I won't be going over 4-0 thru 4-C-3 because they are rather self explanatory in the book along with the pictures about the wrist positions. Also Jeff Mann's Perfect Golf Swing Review site has a glossery of wrist movements HERE.
4-D-0 (Release Motions)
This refers to the release of Power Accumulators #2 (downward uncocking of the left wrist) and Power Accumulator #3 (turning of the left wrist).
Hitters release power accumulators #2 and #3 simulataneously. Swingers release power accumulators #2 and #3 in sequence (2 before 3).
The #2 PA, which uncocks the left wrist is the function of the hands actuating the Clubhead. The #3 PA which turns and rolls the left wrist is the function of the hands actuating the Clubface.
The hitter concentrates on the hand motion while the swinger concentrates on wrist motion. That's because the hitter tends to use the #1 and/or #3 Pressure Points and drives that #1 Power Accumulator into the ball. That's a hand motion function. The swinger tends to use the #2 and #4 Pressure Points and uses a wrist throw in their pattern.
Normally, only swingers will use the 'swivel' into impact. That's because in the swingers backswing they usually roll the clubface with their left arm and hand to square. The hitter will use the right forearm takeaway and the face will be slightly closed in the takeaway and the backswing. So when the swinger comes down on the downswing, they have to roll the wrist back into impact. All golfers must 'swivel' in the follow thru into the Finish.
4-D-1 (The Flat Left Wrist)
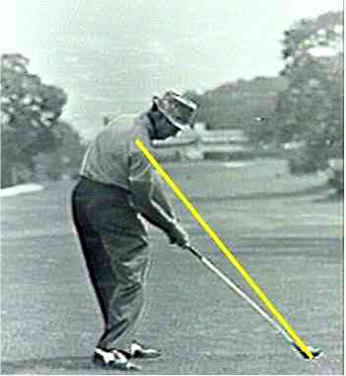
This goes much over what we have discussed in these translations. Here's an example of a golfer without and with a FLW at impact.
The big thing to notice is in the right pic where one could draw a straight line from the left shoulder down to the clubhead. That's a flat left wrist at impact. The pic on the left shows something differently. Many golfers have a forward leaning shaft, but you can still draw a straight line from the left shoulder down to the clubhead.
In order to have a FLW at impact, that means the right wrist must be bent. I still firmly believe the best way to obtain a FLW at impact is to not actively try and have a FLW at impact. The swinger will concentrate on pulling the club with the left side and the pivot. The hitter will concentrate on keeping the right wrist bent.
If there's one thing we can learn from the golfers with a lot of shaft lean it's that the shaft lean is caused by having a steeper Angle of Attack. Say the PGA Tour average angle of attack with a 7-iron is about -4*. Somebody with forward shaft lean may have an AoA of -5* with a 7-iron.
So, if somebody with a sizeable amount of shaft lean has a steeper angle of attack, it's logical to draw that somebody who flips, the exact opposite of forward shaft lean, has way too shallow of an Angle of Attack. So one of the major keys if you want to rid yourself of the flip is you probably need to hit down on the ball much more than you could ever imagine.
12-1-0 and 12-2-0 are a checklist of all of the components and variations of those components that somebody using a 'basic' pattern (be it 'hitting' or 'swinging') would use. From what I've been told, Homer Kelley was undecided on putting this checklist in the book because Homer really did not like the idea of possibly 'recommending' that the golfer do this or that. Paul Hart goes over these checklists in part 6 and 7 of Peter Croker's TGM Downloads. However, Paul Hart is going over the checklist from the 6th edition which is different from the 7th edition.
This checklist is for a basic hitting pattern. You can look up each component variation in Chapter 10. I'll rundown the checklist here:
1. Grip - Overlapping 2. Grip Type - Strong Single Action
3. Stroke Basic - Punch Elbow 4. Stroke Variation - 3 barrel hitter using PA's 1-2-3 5. Plane Line - Square Plane Line, Square Clubface @ P1 6. Plane Angle Basic - Turned Shoulder Plane 7. Plane Shift - Zero Shift (Club stays on TSP throughout swing) 8. Fix - Standard 9. Address - Standard 10. Hinge Action - Angled Hinge 11. Pressure Point Combination - Double (#1 & #3 PP) 12. Pivot - Standard 13. Shoulder Turn - Rotated 14. Hip Turn - Sliding Hips (see 1:10 of video below)
15. Hip Action - Delayed (Right Forearm Takeaway, Hands Controlled Pivot) 16. Knee Action - Right Anchor 17. Foot Action - Flat Left 18. Left Wrist Action - Flat Left 19. Lag Loading - Drive Loading (right arm thrust) 20. Trigger Type - Right Arm Throw 21. Power Package Assembly Point - Top of Swing 22. Power Package Loading Action - Random Sweep 23. Power Package Delivery Path - Straight Line Delivery 24. Power Package Release - Non Automatic Random Sweep Release
As a hitter, here's what I hope to get my swing like after discussing the changes I want to make in a previous blog post:
1. Grip Basic - D - Interlocking 2. Grip Type - B - Strong Single Action
Note: Same grip as shown in the Jeff Evans video, except an interlocking grip instead of an overlapping grip.
3. Stroke Basic - B - Pitch Elbow
Note: Pitch Elbow with hitting for maximum trigger delay.
4. Stroke Variation D - Four Barrel (4-1-2-3) 5. Plane Line - Varies
Note: I use the Hogan stance diagram in order to keep in accordance to 'D-Plane.' So, 'Closed-Square' with driver, 'Square-Square' with irons, 'Open-Square' with short irons.
6. Plane Angle Basic - B - Turned Shoulder 7. Plane Angle Variation - B or C - Single Shift or Double Shift
Note: I was double shifting recently which I would 'prefer' but I've been a single shifter. Either one doesn't really bother me.
8. Fix - A - Standard 9. Address - A - Standard 10. Hinge Action - C - Angled Hinge 11. Pressure Point Combination - B/2 - Double (#1 and #3 PP) 12. Pivot - A - Standard 13. Shoulder Turn - C - Rotated 14. Hip Turn - C - Shiftless 15. Hip Action - B - Delayed 16. Knee Action - B - Left Anchor 17. Foot Action - C - Flat Left Foot 18. Left Wrist Action - C/2 - Single 19. Lag Loading - A - Drive Loading 20. Trigger Type - B - Right Arm Throw 21. Power Package Assembly Point - A - Top 22. Power Package Loading Action - A - Full Sweep 23. Power Package Deliver Path - A - Straight Line Delivery 24. Power Package Release - B - Non-Auto Random Sweep
12-2-0 Drag Loading Basic Pattern (Swinging)
Here's the checklist for the basic pattern for swinging.
1. Grip Basic - Overlap 2. Grip Type - Strong Single 3. Stroke Basic - Pitch Elbow 4. Stroke Variation - Triple Barrel (PA's 4-2-3) 5. Plane Line - Square to Square 6. Plane Angle Basic - Turned Shoulder Plane 7. Plane Angle Variation - Zero Shift 8. Fix - Standard 9. Address - Standard 10. Hinge Action - Dual Horizontal Hinge 11. Pressure Point Combination - Triple (PP's 2,3,4) 12. Pivot - Standard 13. Shoulder Turn - Rotated 14. Hip Turn - Slide 15. Hip Action - Delayed 16. Knee Action - Right Anchor 17. Foot Action - Flat Left 18. Left Wrist Action - Standard 19. Lag Loading - Drag Loading 20. Trigger Type - Wrist Throw 21. Power Package Assembly Point - End 22. Power Package Loading ACtion - Random Sweep 23. Power Package Delivery Path - Top Arc and Straight Line (hands above head at P4, then a straight line path) 24. Power Package Release - Automatic Snap Release
After that the preface directs us to Section 9-1 which goes over Zone #1 which has already been covered. Next up in the translation we'll go over Chapter 4.
I've been getting questions in regards to my swing and I feel like I now have an idea of what I want to do during the 'offseason' and here's what I came up with.
The basic premise is that I want to take much of the swing in the video below and add much of the S&T lower body components to it.
This happened back in May and a few days later I took some more video and came up with these swings.
So why am I so high on these swings? Mainly this was the best I hit the ball all year long. But that wasn't a surprised when you see some of these pics in the swing.
Not only do I like those alignments, but in the last picture I 'kept the head in the circle' on the downswing which is something I was trying to work on earlier.
So, here's some of the changes I plan on working on for now:
P1
Here's my old P1 address.
Here's the new P1 position. The weight is a little more on the left heel, overall with the weight at about 60/40 left side. Posture is better. The handle is moved forward and the ball position is about the same, slightly behind the circle.
I plan on keeping my right forearm 'on plane' at address and still incorporating the Right Forearm Takeaway. However, the right elbow in this 'new' P1 needs to be a little further out in front of the body. I noticed that it was sticking up against my abdomen at address and the 'old' P1 the elbow was out in front of the body. I'll explain why this is important in a bit.
P4
A couple of months ago I lost the AC Power Adapter for my camcorder. Before that I was only filming Face On swings because I had some Face On alignments that I worried about. This was a big error in judgement because I started getting sloppy in my alignments, particularly from the DTL view and that got me where I'm at today.
Here's the major issue
Shaft is sort of 'laid off' at the top, clubface is shut. I think the main problem is the right elbow. Take a look again at that old P4.
As you can see, there's that 'space' between the right elbow and the right side. My 'new' P4 the elbow is glued to the right side.
I believe a major reason why I have gotten away from having that 'space' is because at address I had the right elbow up against my abdomen instead of out in front of the abdomen. I noticed this difference today when I was using what I knew from TGM's curriculum of using 'basic-acquired-total' motion and from what I know about learning feel from mechanics. Basically, I would get myself in the position I wanted the elbow at the top of the swing and then go from the top and drop down to the address position. I then noticed it was much easier to get the elbow in the position I want at the top if the elbow is not up against the abdomen at address.
I HIGHLY recommend that if you're working on your swing like I am, you should videotape it as much as possible. Anytime you're making changes that's a very delicate time and the golfer must 'get it right.' If you're not videotaping the swing, you can easily start doing things wrong that you *think* are right and ingraining a flawed alignment which can lead to compensations. I think with the quality, low cost and convenience of camcorders, Homer Kelley would have been a huge advocate of using a camcorder for all practice sessions.
So, for now the main goal is to work on the right elbow at P4 and see if that gets the clubshaft in a better alignment and the clubface more square. Here's the old P4 from the Face On view.
I like this position very much, but I want it with more waist bend and a little more weight on the left side. Also, if you look at my current P4 from the DTL view, you will see that my right knee is locked. I've confirmed this with the S&T guys and they say that the right leg should 'straighten', but do not lock. If you look at my old P4 from the DTL view, you will see a straightened, but not locked right knee. I think this pic of Mr. Hogan at P4 is something I have in mind.
Essentially, these are the things I want to work on first before I start making adjustments to the downswing. The main theme with the downswing will be the lower body action and 'keeping head in the circle.' However, I think making these adjustments to P1-P4 will help with 'keeping the head in the circle' on the downswing. And remember, here's the footaction I'm looking for.
As far as the other lower body action, I'm looking for more 'linear' hip action on the downswing and getting about 90% of the weight on the left side with a flexed left leg at impact.
My general feeling is that my old swing back in May was very, very good. But the poor posture, lack of waist bend and lower body movement prevented it from being a great golf swing and prevented me from being a really good ballstriker. My main issue that would occasionally creep up in the old May swing was the hips would rotate too quickly and throw the downswing out of whack. So if I can incorporate those S&T lower body components that will make it less likely for me to rotate those hips too early. And I will be more likely to 'get the head into the circle' on the downswing and that will help increase power, accuracy and consistency.
For now, I'll work on the right elbow and the clubface at P4 along with the changes at P1 and post them here probably on Wednesday. Starting Tuesday I plan to get back to an exercise and stretching routine and in about a month I plan on trying a program to help with lower body strength and to better utilize 'ground forces' in the golf swing.
I should be getting the Swing Speed Radar in about a week or so. The goal is to reach my goals with my swing alignments and to increase swing speed. If those things happen, I will probably go to a lower lofted driver with a higher kickpoint shaft. I need a lower lofted 3-wood (13*). I will keep the iron heads, but change the shafts. I put a KBS Shaft in my 6-iron to try it out because that was the shaft I was considering to put in and I really like the shaft. It feels much like a Rifle shaft, but has noticeably more 'zip' to it.
I also plan to get some Trackman time to better help get my swing where I want it and to focus on Angle of Attack, Clubface Angle and 'true path' numbers.
I wanted to address the Tiger Woods situation because I've been e-mailed my thoughts about the subject. For starters, I'm rather indifferent on Tiger. I do admire his ability and think he's good for the game, but I'm not a blind lapdog for him either. OTOH, I clearly do not detest the guy either.
But for the most part I could really care less about the situation unless it's revealed that he's a far worse human than we could ever imagine.
I will give Tiger this advice from years of closely following the media, particuarly in the realm of sports media, and having about a handful of friends and another handful of acquantainces who are journalists.
Tell the truth.
Contrary to the common saying, the cover up isn't always as bad as the crime. But the media never forgives those who lie to them. And while I could pretty much care less about the situation, this thing will only get worse if you try to cover it up. You want privacy and this matter to go away? Tell the truth, whatever it may be. Because at least if you tell the truth, you can always spin it to make it sound better than it actually is. If you lie and get caught lying, most of the media will never forgive you...even until you retire.
I've gotten some questions on what I mean by say 'P7' or 'P3.' These are MORAD terms for certain points of the swing. They are actually very easy to understand and I think it's a very valid and valuable concept because it gets everybody on page (those who know what the 'P's' are) as to what needs to be done where. The P's, I believe, stand for 'parallel.' Anyway, here's the P's.
Here Homer states that the 24 components of the stroke are what the machine should do. There are some indications and symptoms of maladjustment -- things is shouldnot do. These maladjustments are called 'snares' in TGM.
3-F-7-A (STEERING)
Homer states that this is the number one malfunction, meaning it's the most common snare amongst golfers. Steering happens when the golfer tries to hold:
1. The Clubface square to the target line. 2. The Clubhead on the target line. 3. The Clubhed on a level or upward Angle of Attack.
Steering often feels like a lunging and/or an inability to 'release' the clubface thru impact. Steering almost always coincides with coming over the top and losing lag pressure very early on in the downswing.
Homer states:
A very successful and anti-steering therapy is an exaggerated 'inside-out' Cut Shot.
As I've posted before, in TGM terms a cut shot is any time a golfer uses vertical hinging. So here the golfer would take a very inside-to-out swing path with a vertical hinge.
3-F-7-B (QUITTING)
Quitting is when the hands slow down or stop during the release. This is a very important snare to note because the this is usually a big reason why golfers flip thru impact.
Quitting is usually pretty easy to recognize if you have a camcorder or camera as at about impact the hands will be more in the middle of the legs or towards the rear leg. Here's a pic of a golfer steering.
Here's a pic of Tiger at impact, who obviously doesn't 'quit' his hands. See where his hands are, up by the left leg.
I find that quittin usually just before impact when the golfer stops wanting to move his hands and instead uses the right index to flip the wrists thru so the clubhead can make contact with the golf ball.
Homer states that 'quitting' results in:
1. A Bent Plane Line 2. A shortening of the swing radius (which decreases clubhead speed) and depending on Impact Hand location, this will result in either: 3. A 'down only' clubhead path (hitting it fat)
or
4. An 'Up and In' Clubhead path (clubhead should go down-out-forward) An 'up and in' results in a topped shot.
Homer states that quitting is impossible with proper and continuous rhymth. Here's a Lynn Blake video on 'rhythm.'
One of Homer's famous quotes in this book is here and it's SUSTAIN THE LAG. I like to talk a lot about lag pressure in this blog and its importance. My main feeling is that once you can feel lag pressure you should be able to finally 'get it' and reproduce lag pressure at impact on a consistent basis and get rid of the flip. Took me 20 years of golf, playing a highly competitive level, to understand lag pressure and it had a profound effect on my swing.
3-F-7-C (BOBBING)
Bobbing means the head raises and/or lowers throughout the swing. Paul Creamer is a 'bobber.' Homer states that this is due to faulty movement of the back or knees. People get a bit confused about the knees, but the knees play a huge part in the head movement because they are the foundation for the head. Bobbing disrupts the Shoulder-to-ball radius.
3-F-7-D (SWAYING)
'swaying' is incorrect weight shifting due usually to a faulty pivot. Swaying can happen in either directions. Swaying usually produces unorthodox trajectories, erratic timing and teetering balance. This is a very big part of what the Stack and Tilt method tries to eliminate. One thing I like about the Stack and Tilt is it eliminates lunging and makes balancing easier. But when you have shifted the weight for so many years there's still a tendency to want to have the weight more towards your right side at impact.
3-F-7-E
Homer states that all of these malfunctions basically are different ways of disrupting the same geometrical alignment of the downwards and outward arc of the Clubface. I tend to agree a lot with Lynn Blake's assessment that golfers tend to get the 'out and forward' part of the 'down-out-forward', but they usually never get quite enough 'down.'
The PGA Tour averages for Angle of Attack according to trackman are about -3.1* with a 3-iron and -5* with a PW. Your average golfer, who probably flips is usually at something like -1* with a 7-iron.
Homer also states that one of the problems golfers have is that they basically cut across the ball and often the way they combat that is to aim right and pull it back left. This is a compensation for earlier pulls to the left.
A good way to cure this is to stick an umbrella up out of the ground about 10 feet out in front of you. Then aim the clubface at the umbrella and your body parallel to the umbrella. But try and actually the ball to the right of the umbrella without opening the clubface. This will get you on a better path and help eliminate the over the top move.
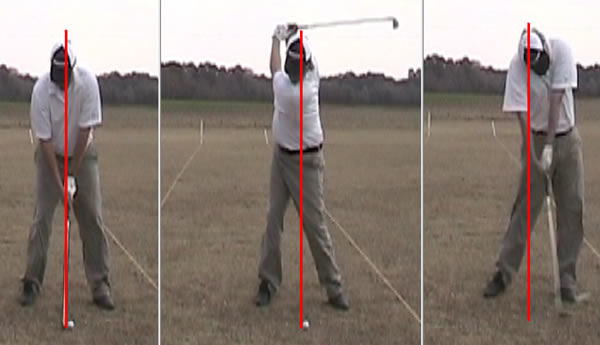
Recently I've been posting about wanting to change some parts of my swing. Particularly my head movement starting at about P5 (left arm parallel to the ground on the downswing) as I noticed that I still have an issue with my neck/head moving downward and away from the target.
One thing that needs to be made clear is that the head isn't exactly 'stationary' in the swing and it's something no good player has ever truly accomplished. Instead, what usually happens is if I were to draw a circle around the golfer's head at address, the PGA Tour player will see the head go slightly outside of that circle in the backswing...then return to the circle in the downswing and stay there until about P9 (when the right arm is parallel to the ground in the follow thru). Here's a link to Ben Hogan's swing over at the Swing Academy site. Just click on 'Analysis View' then click on 'View This Analysis' where my icon is. From there you can see Hogan's head movement go slighty outside of the circle in the backswing and return to the circle on the downswing (it actually returns to the circle at the top of the swing)
I find this to be the case with just about every PGA Tour pro and with it being an issue with my swing as my head moves outside of the circle on the downswing, it saps some power and makes accuracy and consistency a little more difficult to achieve.
Steve Sieracki mentioned that there was too much right knee bend in my swing at about impact which causes the head to dip and go backward.
In order to straighten that right leg more I decided to follow this video of Mike Bennett's footwork.
As you can see, the right foot/ankle rolls to the inside as Bennett comes into impact. This does help straighten the right leg in the downswing which helps allow the hips to start rotating at the right time. Remember, you don't want the hips rotating too early in the downswing or you'll come dead over the top.
However, what you will notice with Bennett's footwork is that it's very similar to Ben Hogan's footwork.
The Richie3Jack blog just wanted to wish everybody a Happy Thanksgiving. For myself, I have a lot to be thankful for.
I'm thankful for my health.
I'm thankful for being able to get back into this great game that I took an 8-year layoff from.
I'm thankful for the technology that allows me a forum to speak my mind and thoughts on the game of golf and use my creativity to develop something that many people can enjoy.
And I'm very thankful for my blog readers, the greatest readership a blog could ask for.
One of the things that people ask me about frequently are the differences in the game, particularly from a competitive standpoint, in today's game compared to my 'heyday' back in the 90's.
Well, I happen to think that the game is A LOT MORE 'user friendly' and just better for the golfer all around.
I remember back only 10 years ago the game had:
- Basically one good golf competitive golf ball (Titleist) - Limited and flawed equipment fitting. - Poor quality of many OEM equipment. - Basically two steel shaft irons to chose from (True Temper and Rifle) - Shoddy graphite shafts. - 99% of instruction was your standard 'pop' instruction. - Non-existent putter fitting. - Limited Golf Fitness expertise. - Poor Soft Spike Design - Virtually non-existent range finders and GPS. - Low Quality Launch Monitors - Non-existent green reading instruction.
Most of these things I've mentioned have made a 180* turnaround. Are there still some major problems with the game? Absolutely. But there's a helluva lot more good than bad being brought to the table. The main questions are preventing the bad becoming too big of a problem and learning from past mistakes.
Still, when I look at things it's a shear pleasure to know that I can go on the internet and check out various Web sites for great information on the golf swing. Understanding something complex like 'The Golfing Machine' or 'D-Plane' can be answered by checking out a few Web sites. The golf swing is much less vague. Something like reading greens is no longer a complete mystery and 'black art' now with AimPoint Golf. And if I want the latest information on equipment there are plenty of sites that help me find the information I'm looking for and finding a place where I can get the very best in equipment. And there's always Ebay if you are looking for something cheap.
In golf, there's almost an endless amount of things to be thankful for these days.
Case in point, let's take a look at my golf swing. Here's some older videos from January and February this year of my swing.
Now, let's take a look at my swing that I filmed Wednesday.
Big difference and much improved ballstriking to boot.
But, to keep up with the theme of golfing thankfulness. I'm looking to continue to improve and after speaking to Steve Sieracki at Dana Dahlquist's forum, I think we may have discovered how to cure one of my biggest issues.
As I mentioned in previous updated swing posts, I wanted to solve two big issues:
1. Stop releasing the #3 PA too early and out of sequence (going 4-1-2-3)
2. Stop getting my head from tilting down and away from the target in downswing.
Sieracki proposes that my issue is the right knee and how it 'kicks out' towards the ball on the downswing. Very noticeable in this pic.
As opposed to a straighter left leg from other golfers like Hogan.
All stuff that ten years ago I probably would've been caught in the cloud of mystery as to why my game isn't where I want it. Now, that's not a problem.
Anyway, I will work on it and do some 'lab work' and see with what I come up with and post it on this blog.
THIS is the machine concept that Homer Kelley talks about in 'The Golfing Machine.' Remember, it's the concept of looking at the swing like you would look at a machine. Here, the 'machine' is a hinge pin that swings along an inclined plane.
The first swing shows a horizontal hinge. The second swing is angled hinge and the last swing is vertical hinge.
I've been asked by a few readers about using the Stack and Tilt swing and what I plan on doing with it from my game.
The big thing that should always be mentioned, and it's my main gripe against the S&T book, is that it should be noted that you don't need to follow every component of the S&T pattern in order for it to help your own ballstriking. You can do very well just adding one or a few of the S&T components.
And like I stated in my book review, I fully believe that all of the S&T components are 'correct' and if you execute them like they want, you will get into better alignments and likely hit very good shots.
The big question is whether or not you can repeat those components consistently.
If Jack Nicklaus tried to use the inside hand path, he would likely never be known as the great Jack Nicklaus. But he did have a very 'centered' pivot and turned the left shoulder downward on the backswing. There's almost countless other examples of golf's greats who had some components of the S&T, but also avoided other components of the S&T in part because they probably could not repeat those consistently.
That's really what the golfer needs to get from the book because there's a decent chance that all of the components may not be easily repeated.
For me, my main goals with my swing for now are:
1. Square Up The Clubface At The Top of the Swing (P4) 2. Stop Getting Above the Plane on the downswing. 3. Stop releasing the #3 Power Accumulator too early and out of sequence. (Supposed to go 4-1-2-3)
The one part of S&T that I really like is the lower body action. Most people see the weight on the left side, which I think is alright. But the left knee I think is a more important component than any. The thing about the weight on the left side is that the goal of that is to get 90% of the weight on the left leg at impact. And I think most swing experts agree, be it TGM or SliceFixer or Sevam1 or Shawn Clement, etc that about 90% of the weight should be on the left side at impact.
However, I feel getting the weight on the left side to start with helps the golfer keep the left leg flexed longer throughout the swing. And that's a big part of what I'm working on. Take a look at some of the all time great ballstrikers' left leg flex thru impact.
My thoughts concur with the book that golfers tend to straighten out their left leg too soon and that usually causes golfers to get above the plane on the downswing.
Why?
Because once that left leg straightens the hips start to turn and that turning of the hips starts to get the right shoulder off plane which gets the club above the plane.
The reason why getting the weight on the left side at address helps with keeping the knee flexed is because the left knee will flex in the backswing no matter what you do. But if you have the weight on the left foot is becomes a little more difficult to push the leg upward so it straightens. Instead it will stay flexed.
It should be noted that the S&T really doesn't have that much of an 'active' hip slide. According to the book the golfer more or less 'leans' into his left leg on the downswing which helps slide the hips a certain amount.
The Address Routine in 3-F-5 basically goes into the 'pre-shot routine.' Ken Venturi used to say that most people 'lose their swing' before they even swing the club. Meaning, their address position was so bad that they really never had a chance to begin with.
Homer Kelley talks about it here, but also adds a mental twist to it.
Most misshots are lost at Address - by not mentally spelling out exactly the selected Stroke Variations and their technique and Feel.
I think people would *think* this is too technical, but it's really not as George Knudson noted in a 1979 interview.
In the interview Knudson stated that he really never got mad after a poor shot and the most upset he would ever get would consist of him wondering aloud 'why bother?' Knudson noted that he would ask himself that if he felt he wasn't mentally prepared and focused to hit the shot at hand as a way of asking 'why did you bother to swing the club anyway?'
The rest of 3-F-5 is pretty basic stuff. Like explaining that the practice swing is a 'dress rehearsal' of the actual swing and the waggle is a 'miniature reproduction.' I agree in part with Homer on the waggle, but it's hardly a mandatory part of the address routine and I don't think it will benefit all golfers. I use a waggle to sense and feel my right forearm and right elbow. Brian Manzella did a nice video on the waggle and why he thinks fewer golfers waggle these days.
3-F-6 (Execution)
All quick, jerky and wobbly motions are improper execution. Neither the hands nor the club are flipped or swished around haphazardly. The ideal -- even with an Automatic Release -- is to be very deliberate, positive and heavy. Never dainty.
If your 'power package' looks flimsy, then that usually indicates a lack of Extensor Action and/or neglecting the Flying Wedges.
Or if you have a flimsy looking 'power package', your issues could be poor translation of the components of the swing or you are trying to incorporate incompatible components.
For instance, if you are trying to use the Left Shoulder takeaway but drive load with a punch elbow and a horizontal hinge, those are a lot of incompatible components and can create a very weak looking 'power package.' And if this is the case you need to go to the range and immediately get it corrected.
Homer states that to achieve a 'Master's Level Execution' which is being able to execute the proper Geometry with or without wristcock, with and without the #3 Accumulator, with any type of hinging (vertical, angled, horizontal), with any Plane Line combination (square-square, square-open, square-closed, etc.), from any ball location, hitting or swinging, with Right Forearm Takeaway, and with a motionless right wrist.
I have been talking about reviewing the AimPoint Golf 'Aim Charts' and I finally got them in the mail and started to try them out.
If you have ever watched a tournament on The Golf Channel and have seen a golfer where they show the line of the putt and where the golfer needs to aim (and they do it with amazing accuracy), that is AimPoint golf, which was created by Mark Sweeney.
Sweeney came up with this idea after watching a British Open on TV and noticing that all of the players in the tournament missed the same putt in the same fashion. So he wanted to come up with a way for golfers to actually understand WHERE to aim. Eventually he discovered that golfers need to be able to read greens, so they can eventually understand how to read their putt so they can eventually know where to aim.
The 'Aim Charts' help the golfer greatly with that. However, they only work on certain types of sloped putts and from 20 feet away. The good news is that is you understand the AimPoint green reading process, you can then understand where you have to aim on all putts, regardless of the type of slope or distance. Below is just one sample of AimPoint's 'Aim Charts.'
I have AimPoint's 'Pro Version' of the Aim Charts which show where to aim on greens with a 9, 10, 11, 12 or 13 speed on the stimpmeter.
In the example above, this shows where to aim on a green with a 10 stimp and with a putt that has either a flatter slope (1.5% slope) or an average slope (2.0% slope). With the aim charts that I have, it actually tells you where to aim on 'flat putts (1.0% slope), Flatter putts (1.5% slope), Average slope (2.0%) and Steep slope (2.5%). But since I don't want to give away the numbers, I just showed this pic where it shows the data for a green with a 10 stimp and for average and flatter slopes.
The first thing you need to do is find the 'Fall Line.' Here's a couple of videos by Geoff Mangum on finding the 'fall line.'
Once you find the fall line and pace off your distance from the cup, you can use the Aim Chart....provided you're on a certain type of slope and you are no further than 20 feet from the cup.
The Aim Chart is based on a few things as well:
1. The number dictates the amount of inches from the edge of the cup you need to aim. So if a putt will break to the right and the number is '0', then you need to aim at the left edge of the cup.
2. This is for a putt speed of 12" past the cup. If you hit the ball harder than that, you will see less break than is stated in the Aim Chart. Hit it too soft, the putt will break more than is stated in the Aim Chart.
3. Provided you have the speed and the aim correct, this will have the ball drop dead center into the cup.
The thing about the Fall line is a putt at '1 o'clock' and a putt at '11 o'clock' will have the SAME AMOUNT of break, just one will break to the right and one will break to the left. The same with a putt at '3 o'clock' and a putt at '9 o'clock.' This is because they are the same distance away from the fall line.
The way the Aim Chart is designed, the numbers on the left side are where the golfer should aim the putter for a 'Flatter' slope putt (1.5% slope). The numbers on the right half side of the aim chart are for 'Average' slope putt (2.0% slope).
So, because 1 o'clock and 11 o'clock putts have the same AMOUNT of break, you have to use those numbers in conjuction with each other.
For example, let's say I'm on a green that has a stimp of 10 and the slope on the putt is about 1.5% ('flatter' slope). I also find that I am at the 3 o'clock position from the fall line and I am 15 feet away.
To find where I should aim, I have to find the 'flatter' slope numbers and find what is the equivalent of the 3 o'clock position. In this case, the flatter slope numbers are on the left side and the equivalent of 3 o'clock is the 9 o'clock numbers.
So, I look and see that the chart says '12.' Because I am at 3 o'clock, the putt will break to the left. So I now know that I need to aim the putter face 12 inches outside of the right edge of the cup.
Here's another example. Let's say I have a green with a 10 stimp and the putt has an 'average' slope of 2.0%. I am at the 11 o'clock position and I am 20 feet away. So, I have to look at the 'average' numbers on the right side half of the chart and find what is the equivalent of being at the 11 o'clock position (1 o'clock).
So when I look at the 'average slope numbers' at the 1 o'clock position (the equivalent of 11 o'clock), I find that from 20 feet away it's saying '14 inches.' Because 11 o'clock putts break to the right, I then need to aim the putter face 14 inches outside of the left edge.
The good thing is that the Aim Charts that I have are actually much easier to read than the Aim Chart in the pic above.
Here's the 'equivalents' of clock positions to the fall line:
Again, the AMOUNT of break is the same from these positions, it's just that the direction of the break is the exact opposite. So 1 thru 5 o'clock breaks left, 7 thru 11 o'clock breaks right.
I find the Aim Charts and understanding how to read greens using AimPoint golf to be almost invaluable. One of the things Sweeney mentions is that golfers tend to have poor putting technique and poor aim because they have aimed at the wrong places for so many years. I found this to be very true as I saw my aim improve using my laser training aid just by understanding where to aim.
When I played in college I was an exceptional putter, but incorrectly aimed at the apex of a breaking putt. I also aimed my putter head usually off to the right of the target. Looking back now I believe my good putting was due to a very aggressive pace with the putt which flattened out the break and allowed me to make putts even if I didn't aim the putter high enough.
However, if you do start working with the Aim Charts you really need to concentrate on the speed because like I stated earlier, the data is for putts with a speed of 12" past the cup.
The charts conform to USGA rules, and cost $20. You can also get a regular version if you play greens that are slower than a 10 on the stimp. However, Sweeney only sells them to golfers who understand AimPoint's system of reading greens because like I stated earlier, the AimChart doesn't work on certain types of slopes. A
In order to get these, you will either need to participate in an AimPoint Green Reading clinic or you will need to watch one of his videos.
For Mark Sweeney's Green Reading clinic schedule, click HERE.
For one of AimPoint's certified instructors, click HERE.
You can also purchase a David Orr video with Mark Sweeney HERE (although I highly suggest getting Orr's Green Reading Basics video (watch first) along with the Green Reading 201' video).
I give AimPoint Golf my highest recommendation for any golfer and feel it is an absolute must for any serious instructor.
A Shawn Clement video on injuries and the golf swing.
Some interesting stuff, particularly when you hear about high handicappers who are in good shape and have flexibility that still get very sore from playing a round of golf. Shawn also goes into some 'ground forces' stuff. I am currently studying more about 'ground forces' and its effect on the golf swing and looking at some possible ways to maximize ground force (or greater improve the force you use against the ground) and see what type of impact it has on my ballstriking. I don't want to give away what I'm studying right now until after I am done with my 'research.'
Just one way to translate the components/procedures of the golf swing. This is a 'crash course' way where the golfer focuses on one component at a time and doesn't worry about what the other components are doing. So if you're working on a full sweep release, a 'crash translation procedure' will have the golfer just focus on executing the full sweep release without worrying about the other 23 components like the power package loading, grip style, drag loading, delivery path, etc.
Then once you master the component, you can fit that component into your swing by adjusting alignments into your swing to accomodate that component.
3-D (Relative Translation Procedure)
The other translation procedure is 'relative translation.' Here the golfer actually looks at the components of their actual swing and they will 'inspect' the component and how well it's executed. Then you can classify the component and compare it to a variation of a component that you plan on adopting.
So, let's say you want to use a 'snap release.' In this 'relative translation procedure' the golfer would first see what type of release they are using. So if you're actually using a 'random sweep release' you want to compare that random sweep release to the snap release which you plan on adopting to your swing.
As te primary purpose, carefully avoid disturbing the other components. As the secondary purpose, supervise the change-over procedure. The change-over may include some realignment or adjustment of other Components, or a tightening of tolerances here and there. Then all these areas should be slowly shifted to the new pattern.
3-E (Expanded Translation)
Basically, once you have developed a good swing with sound components and you have an advanced sense of learning feel from mechanics, it's advisable to come up with a 'key factor' for a simplified feel of your swing.
I think this is something along the lines of figuring out what part of your swing is the key between good ballstriking and lesser ballstriking. Earlier this year I found that to be the #1 Pressure Point and maximizing that pressure at impact. So with this 'expanded translation', my main swing feel/thought was 'max pressure at impact' and I was good to go. If I was still a bit off, then I knew I had to delay that pressure a little more.
In other words, you learn feel from mechanics and then you want to limit the amount of swing feels you have to say 1 or 2 feels so it doesn't clutter the mind and makes the swing more automatic.
3-F-1 (Practice Procedures)
3-D applies more to high handicappers and beginners trying to learn the game:
Golfdom would do the game a great service if it would encourage learning to hit before learning to score. Demanding that beginner observe all the tournament rules when he is practicing Stroke techniques, is kicking him when he's down. He should be admonished, instead, against trying to hit off the fairway grass, out of deep rough, nearly unplayable lies, rocks and traps until he has learned to hit consistently from improved lies -- or even from tees.
And...
Tournament rules are for tournaments and are fair because tournaments are scoring tests. Players should shun tournament play util they have mastered 'Practicing and Playing.'
Then he goes into 'Cross Referencing', 'Instant Simplification' and 'Practice Ranges' which are pretty self explanatory and not overly critical to understanding the book.
Chapter 3 deals a bit with translating the 24 components of the swing, addressing the ball and executing the swing, and finally with what Homer Kelley called 'snares' which is basic troubleshooting of 'the machine' (the swing).
Homer starts off 3-0 (General Overview) with discussing 'feel' and it's importance to the golfer's swing. As I've posted many times in the blog, TGM is really a book about 'feel.' Homer understood that feels are subjective and a feel that may work for oe person may not work for another person. He also understood that feel is extremely important due to the fact that it allows the golfer to repeat the mechanics of their swing over and over. That's why he talks about 'learning feel from mechanics' over 'learnign mechanics from feel.' The golfer really needs to accomplish the proper mechanics FIRST, then try to grasp what that feels like to them. Instead, popular instruction usually talks about the swing feeling a certain way in the hopes you will get the proper mechanics.
Now, it's alright for an instructor to suggest what the mechanics might feel like. But, the overall goal should be to get the mechanics correct FIRST, then work with the student to understand what type of swing feel is best suited so they can repeat the proper mechanics.
Homer does discuss 'computerized feel' which is basically using the brain to sense the feel. I'm a big proponent of golfers using forged, blade style irons because of the importance of the 'computer.' With a forged, blade style iron the golfer can better sense the type of contact they made and send that information to their 'computer.' This gives the feedback of how good the swing was and that it should be repeated. I don't think you get that type of feedback with Game Improvement, cast irons. I think there's room for having forgiving equipment, but too much forgiveness is likely counterproductive.
This is really pretty much most of what TGM is about, allowing the golfer to develop their 'own swing' and having their own swing feels so they can repeat their swing on a consistent basis.
3-A (TRANSLATION OF INSTRUCTION)
Homer states 'a procedure must make sense -- geometrically and technically, else the Translation is faulty.'
I think this is a great point. Some golfers call it 'clearing the fog' and I find that it's extremely important to 'clear the fog' otherwise the golfer with languish in thinking the swing is a mysterious, black magic phenomenon. I think too many golfers want to boil down the golf swing as 'just keep your head down' or 'have the right grip' and they wind up neglecting so many things that they usually never quite get above any problems that arise.
Homer also states that 'this book presents the 'uncompensated' Stroke as a goal, guide and progress report, not as the minimum entrance test.'
A good example of a compensated swing was my swing before I went to see Ted Fort. Now, I still have some compensations, but before I saw Ted I had an extremely shut clubface at the top of the swing. In order to square up the clubface at impact, I wound up opening the face on the downswing to square and almost vertically hinging the club on a full swing. So, a flaw (closed face at the top) caused a compensation (vertical hinging). It also caused me to move the head away from the target on the downswing (another compensation) which prevented having that TGM recommended 'head centered tripod' pivot.
Again an uncompensated swing is the 'goal' according to Kelley, but not mandatory. He refers to compensated swings as a 'specialized technique.'
3-B (PRACTICING AND PLAYING)
Homer talks about golf not being a game where you can just practice all of the or just play all of the time. This is something I completely agree with as I find that I play my best golf when I can split my practice to play time to about 50/50.
He also states that true practice should be more about the mechanics and alignments of the swing and the ball flight should be 'immaterial.' Furthermore, even if you're on the driving range and your main focus is on the ball flight, that is 'playing' because your focus is removed from the mechanics and alignments along with the feel for those mechanics.
So basically you want to practice mechanics and alignments and develop a feel from those mechanics and alignments and then take that feel to the course. For instance, in order to get the weight more on my left side at impact, I started to 'feel' like I was keeping the weight on the left heel throughout the swing. I then took that feel out on the course which allowed me to consistently repeat better mechanics.
'Practice' is observation, selection, adjustment, etc. -- the flexible 'researcher' approach. 'Playing' is concentration, discipline, supervision, execution, etc. -- the inflexible 'performer' approach.
Homer also makes a really good quote here as well.
No one, especially beginners, should ever trust Feel alone. With any change or addition -- Look, Look, Look -- until you're sure you have it right. When finally it can be done properly while being watched, the next step can be taken.
It's not that feel is wrong, it's just that you need to get into the proper mechanics and alignments first and when you're making an adjustment to your swing, there's the tendency to fight the adjustment in your swing. So the golfer, when practicing, needs to 'look, LOOK and LOOK to see if those alignments and mechanics are proper.
That's why I am a gigantic proponent of using the camera. It allows the golfer to get a better 'look' at those mechanics and alignments. If a swing felt pretty good and you hit a pretty good shot, go back to the camera and look how you did. If the mechanics were pretty good on that swing, keep doing it. If the mechanics were poor on that swing, then you more or less 'got lucky' and need to keep working on getting those better mechanics and alignments.
Homer also talks about the 'Closed Eyes' Technique which is just closing your eyes while executing the proper mechanics to better understand how that feels.
Eons of manhours are lost trying to substitute effort for technique and trying to eliminate effect instead of cause.
Since I've been getting more questions about S&T, I decided to post some Nick Clearwater (certified S&T instructor) videos on the basics.
One of the questions I've received about is new Tour instructor sensation Sean Foley and what he teaches.
From what I've gathered, Foley is good friends with Mike Bennett and Andy Plummer. He's picked their brains in regards to the S&T method. Foley teaches most notably Hunter Mahan (who got robbed in last year's US Open) and Sean O'Haire. Mahan has *some* of the S&T components. O'Haire has just about all of the S&T components. As I've emphasized here quite a bit, the S&T people really need to make it clear that you don't need all of the components of the S&T in order for it to help your game. So if you don't like all that weight on the left side or the abbreviated, belly out finish...well, you don't need those in your swing and can use other parts of the S&T and improve your ballstriking.
Also, I think it should be made clear that all of the great ballstrikers have at least one, but not NECESSARILY all components of the S&T. While Nicklaus had a centered spine and pivot on the backswing, somebody like Trevino had the lower body moving toward the target and a bent left leg much through the downswing.
I think if these points were made more clear, there would be less controversy and less denouncing of the S&T. But, perhaps they want that controversy because as the old saying goes 'there is no such thing as bad publicity.'
As I discussed in my 'The Stack and Tilt Swing' book review, one of the beauties of the S&T method is that you don't have to use all of the components of the swing in order for it to be helpful for you to use.
One of the things I've worked on was keeping the weight more towards my left foot throughout the swing. One thing I have noticed is that before I even tried this is I hit very good shots from downhill lies. I also noticed on the range one day that I was hitting my punch shots further than my full swings. I believed this was due to being able to get the weight on the front foot at impact.
I added a little more waist bend at address and tried to feel the weight on my left heel. The impact alignments look good here.
I plan on getting more of a S&T-ish lower body action as well as working on squaring up the clubface at the top of the swing (very shut at the top right now).
I've gotten a few e-mails (Richie3Jack@yahoo.com) asking about improving and being prepared in the offseason. I don't have to worry about that as much living in Atlanta, but having grown up in Upstate NY, I know a thing or two about trying to stay in the groove during the winter.
First off, if you have a garage, I would suggest getting a mat and a net along with a camcorder to tape your swing. For the hitting net, I suggest Izzo's Giant Jr. Hitting net ($139).
There are a lot of decent, rather inexpensive mats out there. But the mat that I like best is the Fairway Pro Mat.
However, it's not cheap ($199). But they do have a deal for $364 where you get the FairwayPro Mat, the stance mat and a hitting net.
I strongly feel that the camcorder is a powerful tool for the golfer. At a bare minimum, I would suggest a Mini-DV that MUST have a shutter speed of at least 1/2,000th. Often times this may be referred to as 'sports mode.' I use a Samsung SC-D382 that has a shutter speed that can go up to 1/10,000th. Having a camcorder to record your swing that leaves everything blurry doesn't do the golfer any good. If you want to go high end, then I recommend the Casio EX-FC100 if you want that 'Swing Vision' type of recording.
Also, if you are located near a Trackman and/or SAM Puttlab owner, I would check them out to see what your clubhead dyamics and putting stroke looks like.
Hopefully, you have been keeping statistics on your play throughout the season. This allows you to better understand what your weaknesses and strengths are an hopefully attack them in the offseason and set yourself some new statistical goal for next season.
For example, here's a few of mine:
Average 13/18 GIR 1.760 Putts/GIR 55% Scramble Success 75% Fairways Hit
I also want to hit the Tour Average of Putts made from each distance:
Now, some of the statistics seem unreasonable because of what the PGA Tour averages are. However, I'm playing courses that are much less difficult than your average PGA Tour course. Last Summer I actually hit 78% of my fairways which would make me the #1 Accurate Drive on Tour. The reality is that I'm not nearly as long as most Tour players and hitting fairways on PGA Tour courses is more difficult. I *believe* I would have been a fairly accurate driver of the ball on any Tour with how I struck the driver this past Summer, but my accuracy rate was so good this year mainly due to the courses being a bit more wide open (and the fairways not being cut as low).
A lot of this depends on what you and your teacher are working on, but with the swing I find there are 3 critical spots where if you can have pretty good alignments with, you're likely going to hit a good shot.
P6
Let it be noted that these are hardly mandatory alignments, but more or less some suggestions.
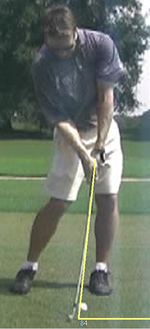
'P6' is known as 'Parallel 6' and it's the point that the clubshaft is parallel to the ground on the downswing, before impact. P6 is a MORAD term.
I'm a believer that golfers should get the downswing plane 'fixed' first and then start worrying more about the Flat Left Wrist at impact. You can play pretty good golf with a big flip, but if you're well over plane or under plane on the downswing you could have some serious problems. As you will notice at P6, the clubshaft is parallel to the target line. Also, the toe is pointig straight up. Get into this position on the downswing and you are on plane and ready to return the clubface square tot he ball at impact.
IMPACT
Obviously the flat left wrist is what golfers want. I highly recommend the Taly to help with the FLW at impact. I developed a 'curriculum' for working with the Taly that I posted HERE. Here's a video on using the Taly as well.
From the DTL view, one good alignment, but certainly not mandatory is having the 'right forearm on plane.' This is when the clubshaft and the right forearm are in line with each other. Mr. Snead executed it perfectly.
Again, it's certainly not mandatory, but if you can get into that alignment you're likely going to hit very good golf shots.
P4
'P4' is the Top of the Swing position. And again, these are some general 'guidelines.' This photo of Moe Norman shows an excellent P4 alignments.
As you can see, Moe's clubshaft is also parallel to the target line. That's an 'on plane' shaft. If it was left of parallel, that would be called 'laid off.' If it was right of parallel that would be called 'across the line.' Again, hardly mandatory. Ian Poulter, Tiger and Vijay Singh get a bit 'laid off.' Kenny Perry is 'across the line.' I would rather see golfers be across the line than laid off, but if you're struggling I think this is an alignment to check out.
More importantly, IMO, is to notice how the clubface is at the same angle as the left forearm. This is a 'square' clubface.
This does change depending on the club and the type and amount of shoulder turn. The S&T guys use an upright shoulder turn on the backswing which makes it very difficult to get the club to parallel at P4.
Because the club can't get to parallel, the shaft does point left of parallel here, but in this case it is NOT 'laid off.' Often times poor alignments at P4 cause poor alignments at P6 which cause poor alignments at P7.
PUTTING
I'm not too big of a fan of most putting stroke training aids, if anything because often times the putting stroke isn't that big of an issue. Dave Pelz has some good training aids in the Truth Board (highly recommended), the Putting Tutor and the Putting Clips.
The main thing I would suggest working on is aim an getting the putterface square to the target at impact. I would highly recommend some type of laser aid to clip onto your putterface and measure your aim at address.
From there, I would study up on AimPoint Golf's Web site so you can better understand green reading and where to aim. I am supposed to be getting my set of AimCharts in the next few days. Once I get them, I'll give a review.
You may also want to get a putter fitting if you haven't already.
EXERCISE
Titleist Performance Institute has certified instructors around the nation that can analyze your current body and flexibility and give a program geared towards improving your weak points. I've heard rave reviews about it, but it's not cheap ($250 for the analysis).
Roger Fredericks has a good stretching program for golf that is easy to pickup.
I basically believe that the key for golf exercise is total body flexibility, strength in the lower arm area (forearms, wrists, hands) and lower body strength (glutes, hamstrings, calfs, feet). I plan on getting into an exercise program that is a little different, but gets into those areas.
Homer states that all of these release can apply to either the hitter or the swing.
FULL SWEEP RELEASE - The release begins in the startdown by either a hand throw (swinger) or a right arm throw (hitter). Lindsey Gahm, a Brian Manzella student is a perfect example of a golfer that uses a 'Full Sweep Release.'
Tom Watson is another golfer that utilizes a full sweep release.
SNAP RELEASE - This procedure delays the release for as long as possible. Sergio Garcia is a perfect example of a golfer using 'snap release.'
RANDOM SWEEP RELEASE - This procedure sees the release happen somewhere between 'snap' (delayed as long as possible) and 'full sweep' (release begins at the start down). Kenny Perry displays a 'random sweep' release here.
There are two variations of the 'snap' and 'random sweep' release, called 'automatic' and 'non-automatic.'
Non-Automatic = deliberate manipulation by the golfer to release the club at a certain spot in the downswing.
Automatic = No deliberate manipulation of the hands to release the club, usually a manipulation of the aiming point (further forward for shorter clubs, backwards for longer clubs) will create this release.
Per the Endless Belt Effect (2-K), the bigger the 'pulley', the faster the hands have to move.
Going from the largest to the smallest 'pulley', it goes:
Full Sweep - Random Sweep - Snap
Thus, per the Endless Belt effect if you took two golfers who had a clubhead speed of 100 mph. The golfer with the full sweep release needs to move his hands faster to achieve that clubhead speed than the golfer that uses the snap release.
FLIP RELEASE - Flip release doesn't mean that the golfer 'casts' the club and/or has a bent left wrist at impact. I plan on asking David Orr a little more about it, but here is what one of his students had to say on his forum.
A flip release is most compatible with a circle path delivery where the clubhead follows the delivery line of the left arm resulting in a sequenced release. It's motion is a circular motion that is online and it is best used with a weak grip and the steeper planes.
Here's a video of one of Orr's students, Elliot Gealy, using the Flip Release.
David also noted that Phil Mickelson and Ernie Els use a flip release. From what I understand of the procedure, I have executed it before and it produces a very powerful shot. Part 11 of Peter Croker's TGM Downloads goes into the Flip Release as well with Paul Hart. Although Hart claims that Sergio uses a 'flip release', I am inclined to believe that he is incorrect in that assessment.