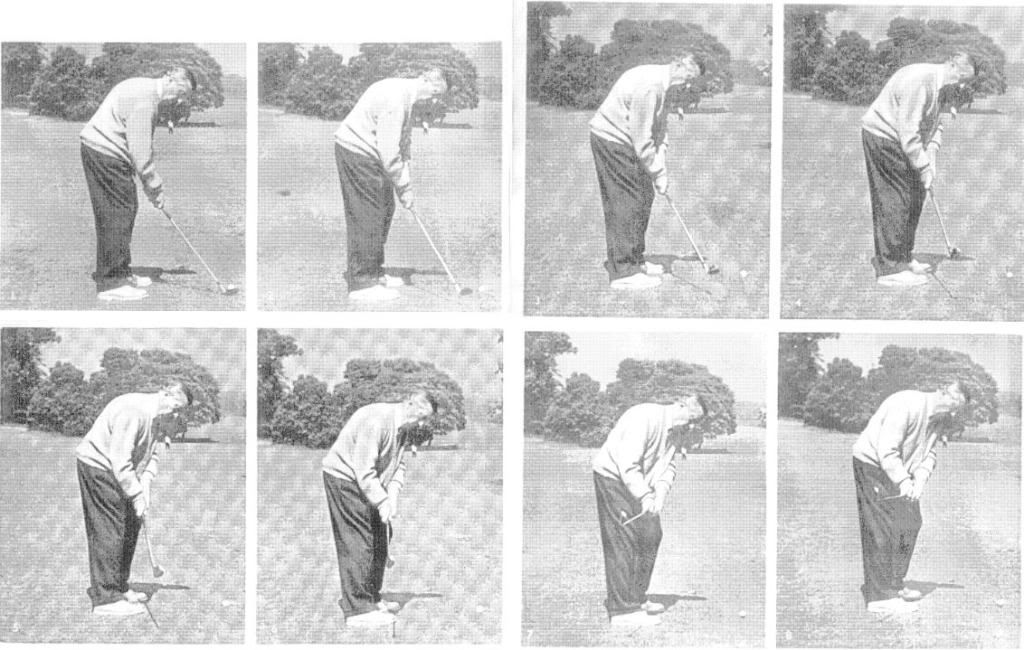
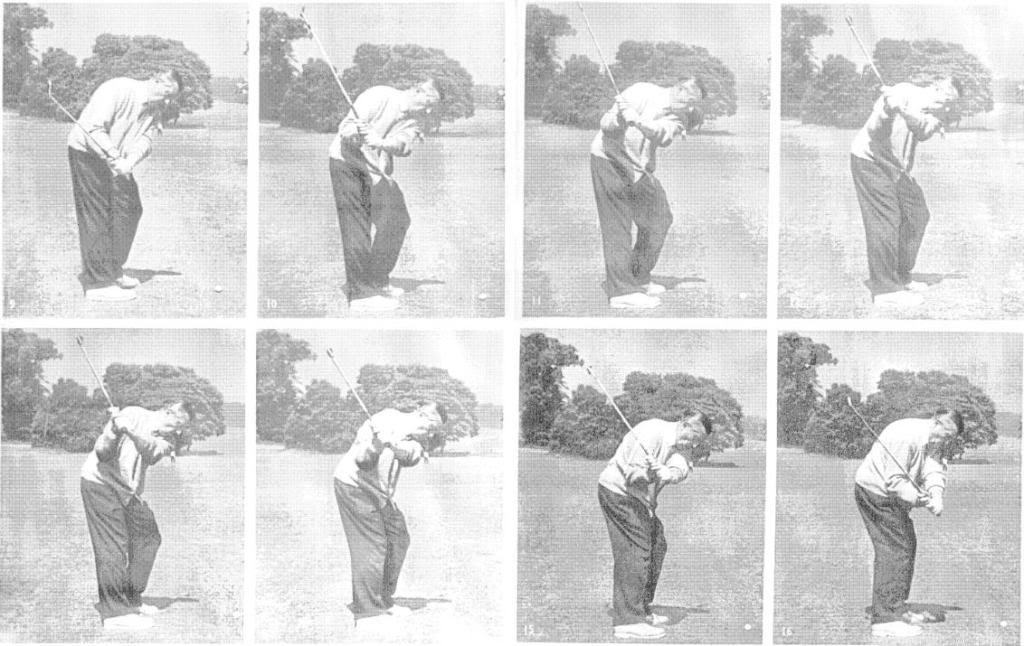
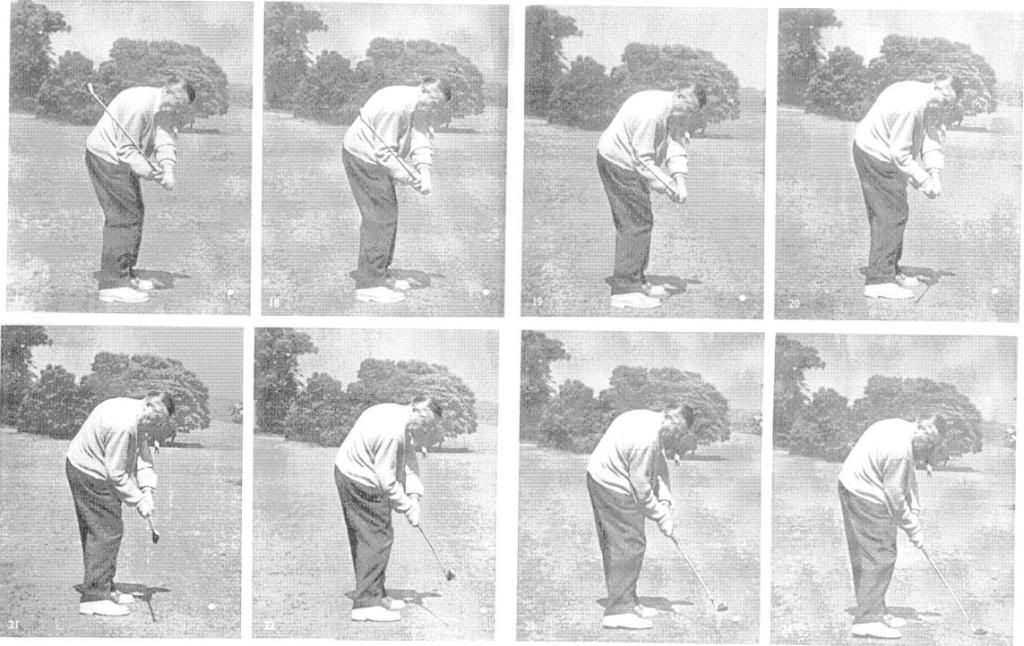
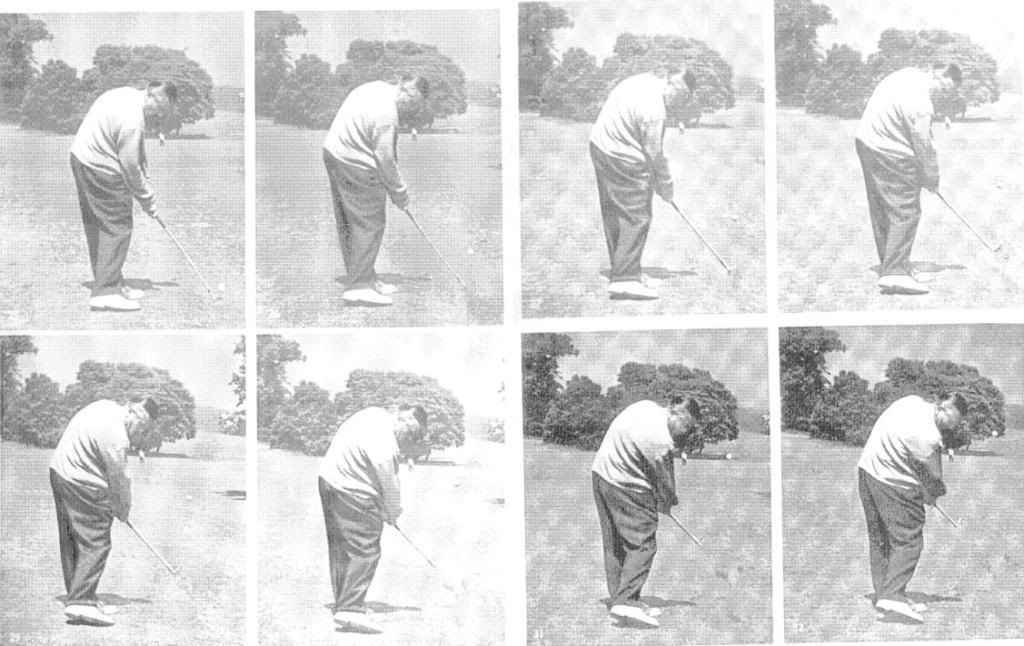
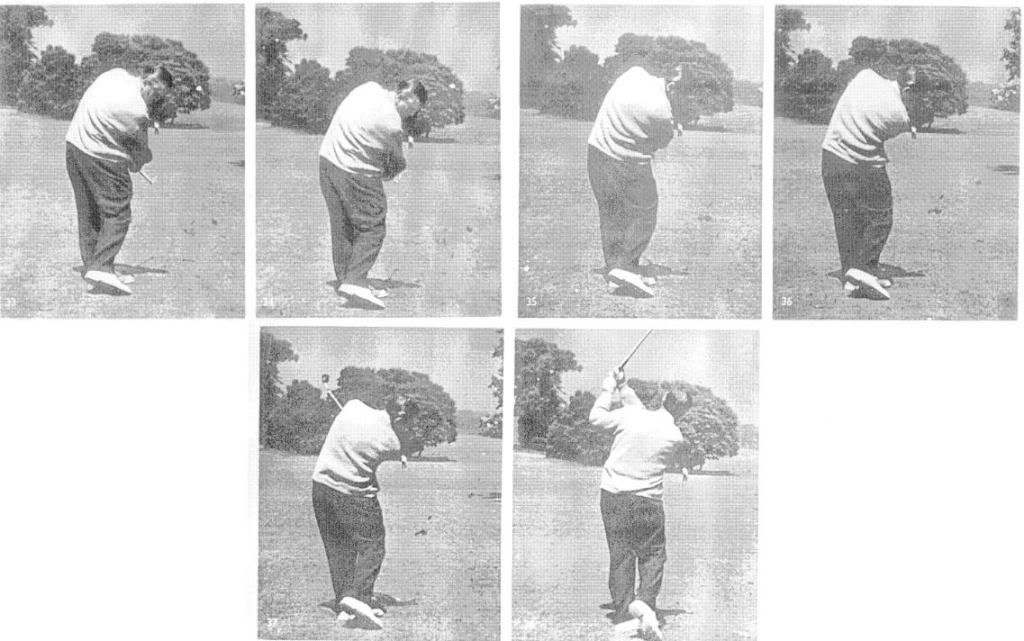
Here's some still pics of the downswing:


Looks like a 'swinger' action with a nice amount of float loading involved.
3JACK


During the Greater Atlanta Women's Amateur Championship a competitor's ball was perched precariously on the side of a hill near a green. She moved some loose impediments in the vicinity of the ball and also took some practice swings in the area. After making her last practice swing but before addressing the ball, the ball rolled down the hill. The golfer instinctively retrieved the ball and replaced it where it lay.
She then played the stroke from where the ball had been replaced and the group subsequently asked for rules assistance at the conclusion of their round.
The rules committee had to weigh in a bunch of factors, particularly that the wind was blowing at 20+ mph.
But finally the decision says that if there is any doubt in determining whether the player may have caused the ball to move it should be resolved AGAINST the player. That means that the player is required to be very careful with his or her golf ball when it is in play, otherwise, penalties could be forthcoming." - Golf Georgia Magazine July/August 2009 pg. 40
Ben Crenshaw - 54 votes (35%)The other poll about where your mis-hits tend to be pretty much ended in a 4 way tie.
Bobby Locke - 21 votes (13%)
Loren Roberts - 20 votes (13%)
Paul Runyan - 12 votes (7%)
Billy Casper - 11 votes (7%)
Seve Ballesteros - 10 votes (6%)
Phil Mickelson - 10 votes (6%)
Nick Faldo - 4 votes (2%)
Greg Norman - 4 votes (2%)
George Archer - 4 votes (2%)
Mark McNulty - 1 vote (0%)


What are the keys to achieving the optimal, straight shot?Please note a couple of things. The old TGM laws would say that the face needed to be slightly open at impact to hit a straight shot at the target. Also, it was thought that a mis-hit would cause a loss in distance. Trackman is saying that it also causes a loss in accuracy.
In terms of club delivery, it is fairly simple since there are just three
parameters in play. To hit a straight and effective shot at the target,
you need:
1. Club Path ZERO
2. Face Angle ZERO
3. Impact in the center of the clubface.
For a 6 iron, if the club path and face angle are both between +/-1°, this would, more or less, guarantee a straight shot (assuming center hit). But for the Driver, it is required that the club path and face angle are both between +/- 0.5° to achieve the straight shot (assuming center hit).So when you want to understand why it is harder to hit a driver well versus hitting an iron well, spin axis provides an answer.
Why is it more sensitive for the Driver than for the 6 iron?
As a rule of thumb, for a 6 iron the ball’s spin axis will be tilted two times the difference between the face angle and the club path, whereas for the Driver, the ball’s spin axis will be tilted 4 times the difference between the club path and the face angle. So if face angle is 5° and club path is 3°, then for a driver the spin axis will be around 8°, whereas for a 6 iron the spin axis would be around 4°. To understand why, we have to look at the so-called D-plane.
For years we have heard the mantra ‘swing all clubs the same way’. But I would not agree to that. Golfers need different swings to be most effective with their shots. In order to take a divot after impacting the ball (irons), you need to hit down on the ball – negative Attack Angle. Conversely, hitting up on the ball – positive Attack Angle – with the driver enables you to maximize your distance for your club head speed.
So, let’s assume that your vertical swing plane with a 6 iron is 60° and your attack angle is -5°. In order to create a straight shot, your goal is a club path of 0°. How can this be achieved? The answer is a Horizontal Swing Plane of -2.5°, which means aim 2.5° left of the target line with your swing plane.
In summary, for a swing having a 60° vertical swing plane, an attack angle of -5°, and a horizontal swing plane of -2.5°, the result will be a club path of 0°.

These charts and figures can be rather academic. Can you explain it in a very down to earth way?Okay, KEY POINTS HERE.
I can try: We can say that with the driver you need the same value for attack angle and horizontal swing plane in order to obtain a 0° club path – for example if your attack angle is +3°, the horizontal swing plane needs to be +3° to obtain a club path of 0°. And for irons it is half effect – for example if attack angle is -4°, the horizontal swing plane needs to be -2° to obtain zero club path. In short,
aim left when hitting down on the ball and aim right when hitting up upon the ball. And remember when I say ‘aim left’ I mean the swing plane, the face angle should always be aligned towards the target line.
Ball position is an issue here as well?One of the things that is taught by many TGM'ers is that if you want to hit a draw, you should put the ball back further in your stance and open the face slightly. Trackman is saying that when you do that, you effectively cause the angle of attack to be steeper. This means the golfer now has to swing more left to hit the ball perfectly straight. But moving the ball back in your stance also causes the clubpath to be more inside-to-outside as well. So what we know about the 'new ball flight laws', curvature of the ball is caused by the clubpath in relation to the face angle at impact (actually it's seperation, but to make it easy we'll say impact.) So by moving the ball back in your stance, you're just causing more of an inside-to-outside path which creates a hook spin. And by opening the face, you're allowing the ball to start out to the right and then draw back towards the target.
Absolutely. If you move the ball back towards your right foot for the same horizontal swing plane, the effect will be a steeper attack angle (more negative) and a more inside-out club path (more positive). So, in order to maintain a zero club path while moving the ball further back in your stance, you simply have to rotate your horizontal swing plane towards the left (more open stance).
How close to center impact do you need to be? How big is the effect of off-center hits?DRIVER: EFFECT ON OFF-CENTER HITS (W/ZERO DEGREE FACE ANGLE AND CLUB PATH
Impact location and gear effect have a surprisingly significant effect on the curvature of a golf shot. If we start with the ideal situation with a face angle of 0° and a club path of 0° and impacting the ball in the center of gravity of the club face, then the ball will go straight. However, if you impact the ball just 1 dimple (0.14 inch) towards the heel of your driver, it creates a spin axis of +6° (fade spin) and the ball will end up 10 yards right of the target line on a 250 yards carry shot.
You will probably be on the fairway, but in a major with very narrow landing areas and firm turf conditions, the shot may be in jeopardy of missing the fairway. If you impact as much as half an inch towards the Toe, the dispersion will be 35 yards left of the target on a 250 yards carry!
Luckily the club manufactures have added a curvature to the club face (the bulge) on woods and drivers. This means that when you impact the ball on the heel your face angle at the impact point will most likely be closed, hereby starting the ball more left and tilting the D-plane towards a draw spin. The net effect will be a much straighter shot compared to the zero face angle situation.
The hitting action is a bit the dark side of the moon when it comes to golf instruction. It seems that a vast majority of golf instructors (with the exception of The Golfing Machine Instructors of course) are simply unaware of its existence and mainly teach golf the "Swinging way".This is pretty much dead on to me. However, I even find that the majority of TGM Instructors teach or feel more comfortable teaching a 'swinging' method. Brian Manzella calls 'swinging' as 'force along the clubshaft' and hitting 'force across the shaft.' I actually like this term quite a bit because I believe that technically we all do a little of both of 'swinging' and 'hitting', but there needs to be a term for what we primarily do. But if you go thru any golf magazine article, most of the time they are teaching something from the 'swinging' or the 'force along the shaft' standpoint.
This is very unfortunate because it is a very efficient way to strike the golf ball and to my opinion a very interesting alternative for strong or less flexible players.
Unlike the Swinger who manipulates centrifugal force, the pure Hitter ONLY uses his right arm to activate the Primary Lever Assembly (that is the Left Arm plus the club as a whole).For those interested, the muscle involved here is the right triceps as it is responsible for straightening the arm. So if you are a boxer you should give the Hitting stroke a try !Excellent, excellent, excellent. I would also mention that the right forearm moves a bit like a piston in a car engine as well. Or feeling like you are using a palm heel strike into the ground.
The main action involved here is a muscular thrust of the right arm against the Primary Lever Assembly.The clubhead is not thrown into orbit by the pivot; Instead, the hitter pushes radially (against the radius!) against the shaft with his right arm only.
Think of it like pushing against one spoke of a bicycle wheel to put the wheel into motion - Swinging would make you drag the rim of the wheel.
The proper action is to straighten the right arm without flattening the right wrist in a piston like action.

This position, while not mandatory, allows for an easier pickup of the Primary Lever Assembly as a whole by the right arm (the right forearm takeaway). Also it establishes the proper impact alignments right away.Excellent again. Many people get into hitting and then work from impact fix at address and struggle and then give up on hitting. However, I think that's giving up on it too soon as the author writes, impact fix is NOT MANDATORY. In fact, I do not use impact fix. Neither does Lynn Blake when he's using a hitting procedure. However, the beauty of impact fix is that it makes the procedure simple to understand. Just keep those alignments in the swing and you'll have a flat left wrist at impact. But again, not mandatory.
From this position all you have to do is to freeze your wrists into their position and move the whole thing back and forth with your right arm pretty much in a piston like motion.
A good way to feel this motion is, without a club, to hold your left wrist with your right hand and move your left arm back and forth. Simple enough? Well this is the principle of the Hitting motion.
Let me explain: For the Hitter, an efficient way to establish the Lag is to resist the backstroke motion then perform a right arm thrust against this clubhead Lag striving to accelerate a pre stressed clubshaft from a slow startdown through impact and to both arms straight.'Running out of Right Arm' means that the right arm is fully extended at impact. One of the key concepts that most golfers do not grasp is that at impact, the right arm should be slightly bent at the elbow.
Here, the Pivot (Right Shoulder) must also provide the initial acceleration of the Power Package (Shoulders, Arms, Hands and Club).
But beware! From there, you only have your bent right arm to provide the Thrust. So, if the right arm begins to straighten too soon, you will have triggered the release, and you will run out of right arm before impact and product a nasty Clubhead Throwaway.
As previously mentioned, for the Hitter a slow Start Down is mandatory to allow for the right arm to properly get into position.
In the transition from the Top to Start Down think very Slow and very Heavy and that should do the trick.
Extremely important. I think this is key for 'swingers' as well even though Homer Kelley prescribes a quick startdown for 'swingers.'
Summing things upI would only slightly disagree with point #3. Over at LynnBlakeGolf.com there was some talk about how 'hitters' cannot have a longer backswing with the hands above the rear shoulder at the top of the swing and Lynn Blake put that to rest and said that is up to the golfer a well. Generally, hitters do have shorter backswings, but that's hardly mandatory.
1. Set up at Impact Fix and "freeze" your wrists alignments.
2. Pick up the whole thing back in a "piston + fanning" like motion (a piston-only motion would make you look like starting a lawnmower which is not the motion we want).
3. Perform what feels like a shorter backstroke as what you are used to.
From the top, initiate a slow startdown by pushing against the shaft with your right arm only (pressure point #1 feel). The slow start down will give yourself enough time to get closer to the ball to deliver your blow.
4. Drive it strongly down and out. Destroy the ground!


AIM THE BALL LINE
1. Aim from behind the ball,
2. walk to the marker on the green with the ball in hand,
3. squat low and look level at the target with the ball held at eye level so that the line on the ball is aimed directly at the target like a rifle,
4. lower the ball and the line vertically to the marker without changing the aim of the ball's line,
CHECK THE BALL LINE AIM FROM BEHIND
5. step back behind the ball to check the aim using your putter shaft to connect the dots of ball with line and target along the outside edge of the shaft to make sure the ball's line parallels the shaft edge,
AIM THE PUTTER FACE THRU THE BALL LINE
6. walk back to the ball and aim the putter face squarely thru the ball with the alignment mark on the putter matching the line on the ball and the sweetspot of the putter centered at the back of the line on the ball,
SET UP BESIDE THE BALL TO THE PUTTER FACE AS AIMED
7. set up to the putter face as aimed with the throat line the same as or parallel slightly behind the leading edge of the putter face and with the shoulder joints parallel to the aim of the putter face and with the eyeballs physically directly / vertically above the sweetspot of the putter,
8. aim the face itself (not the eyes) at the sweetspot of the putter face as if there is an arrow sticking straight thru the back of the head out of the bridge of your nose so that the arrow is perpendicular to the plane of your face (the same face plane as shown by holding flat palms behind each ear),
CHECK THE AIM OF THE BALL LINE AND PUTTER FACE FROM BESIDE THE BALL
9. close the left eye (eye closest to the target) and use the right eye to look inward at the point where your nose meets your eyebrow in a peak or arrow-head shape blocking your vision and note where on the ground about 1-2 feet left of the ball this visual border point appears to meet the ground,
10. make sure this peak point in your face / nose-eyebrow is positioned along the same line on the ground indicated by the line on the ball and the aim of the putter face,
11. rotate or swivel the head to turn the face and eyes towards the target so that the top of the head and top of the swivel axis simply spins in place and does not sway left or right as the face turns,
12. observe that the peak in your nose-eyebrow border appears to run in a straight line along the ground as a result of this head swivel and that this straight line is the same as the aim of the ball line and the putter face,
13. at the end of the distance, notice WHETHER the aim of the ball line and putter face point at the target as intended or to the left or to the right of the intended target spot by noticing what exact spot on the ground at the end of the line shows up just inside the peak, as this spot on the ground will be the same spot that the putter face and ball line actually aim at.
Depending upon the result of this final "checking" of where the ball line and putter face appear to aim (using the correct, accurate body procedure to find out), you will either agree that the putter face and ball line aim at the target as intended or see exactly which way and how much the aim is off and make the appropriate adjustment and check a second time. Once the checking verifies that the ball line has been aimed accurately, you can trust that a straight stroke thru the ball down the same aim the ball line indicates is exactly what you should do when you make the stroke.
Notice that unless in #7 above you position the eyeballs vertically above the ball (when the line on the ball is not tilted but is oriented vertically in plane to the ground), you will look down from slightly inside the ball on a tilted angle of view and the "line" on the ball will not actually appear straight, but will look more like a "rainbow" curve of a rope draped over the top of a beach ball seen on a slight tilted angle. The "line" on the ball will ONLY appear to be a straight line when the angle of view is straight down onto the line. So if the line is vertical, the angle of view also has to be vertical. If you position the eyeballs slightly inside the ball, the the line on the ball has to be tilted towards your face so that the line of sight aims straight down into the top of the line. otherwise, you will be looking at a curled "line" that biases your stroke to the inside with a pull stroke.
When I am preparing for a tournament I spend most of my time "mapping" the greens and a surrounding area of about 30 yards to include bunkers, swails, or anything else not seen from the fairway. There are several ways to do this but my procedure is as follows:
1. Either buy a yardage book of the course if it has a quality drawing of the green or go to google earth and print out pictures of the course and each green. You would be surprised what kind of detail you can get from this. Google earth will also give you an exact "true north" position for each hole. This is important for "grain" and wind direction. If neither of these is available I draw it as acurately as possible.
2. Once I have a green diagram, I pace the green depth front to back, side to side, and also diagonally if I feel I may be coming in from an odd angle such as par 5's or short par 4's.
3. As I am pacing these areas I also note distances to ridges, bunker edges, downslopes, etc, and place directional arrows on areas where there is significant slopes or run-off areas.
4. Once I have the green and surrounds complete I look for potential hole locations and mark those. Once I have these I create "go spots" and "no-go spots". When playing a tournament I often do not have the luxury of guessing. I need to know that I have a "green light" to a flag or not. I also make note of green "breaks", firmness, and pace.
I try to play at least two practice rounds in order to become familiar with the course. I do not spend as much time mapping the course because most things are in front of you and I use a rangefinder. If I am not able to use a rangefinder then I spend more time mapping the course as well.
Hope this helps. I would love to hear from some of the pro caddies out there to see what they do for their players.
I use true north as a reference only. When the wind is coming from the West/Northwest I can mark it on each hole so the "swirls" do not confuse me. Also if you are playing in an area where everything breaks toward the ocean, or Indio, or whatever, I can always have that reference.
For those who play on bermuda, grain is always an issue. The grain will typically grow toward the west (setting sun). Once again having a reference helps to eliminate doubt and is by no means an absolute.