Tuesday, July 10, 2012

Understanding the Wishon June 2012 e-Tech Report

About every month or so, Tom Wishon has an updated ‘e-Tech Report’ which is more or less a newsletter discussing equipment, clubfitting and his research that has been conducted. I have found his e-Tech Reports to be very enlightening, in particular the last e-Tech report, which can be found here.

http://wishongolf.com/etech/archive/2012-2/june-2012/

The latest e-Tech report goes into shafts. Shafts are something I’ve been studying quite a bit this year. Ironically, I ordered Wishon’s ‘Shaft Bend Profile Software’ program right around the time the 2012 PGA Merchandise Show happened and from there I started to notice that I played better with a softer shaft or so I thought.

Before I go on further, if you’re into equipment and want to really find the shafts for you, I recommend Wishon’s Shaft Bend Profile software, which is available to be purchased by the public (even if you’re not a clubmaker) for $130. The database is updated for free about twice a year to include new shafts and not only can you start to understand shafts that fit your swing, but also much more affordable shaft alternatives. The software can be purchased at

http://wishongolf.com/store/technologyitems/


DISPELLING THE MAJOR MYTH ABOUT SHAFTS

I think the concept that has to change about how a golfer thinks about shafts is to stop labeling shafts as a ‘good’ shaft or a ‘bad’ shaft. The reality is that the level of quality of a shaft does not really differ from one company to another. The difference is that the shaft may or may not fit your golf swing. So if you like a certain shaft or a certain companies shafts, you are more or less finding that the shaft(s) just happen to fit your swing.

Now, some stock shafts are just poorly made in the sense that they *might* be designed to be a little thinner than their after market counterpart in order to save some money. But, it’s not like some golfers cannot hit those shafts well. I just think that they are a little more apt to break if you slam or throw the club. Also, I believe that the characteristics of *some* of the stock shafts are different from their after market counterparts. In fact, Wishon’s Shaft Bend Profile software does indeed have different data for some of the stock shafts and their after market counterparts.


Even still, some golfers may hit that stock shaft well. It’s simply a case if the attributes of the shaft fit the golfer’s swing. You may be a little averse, and rightfully so, to stock shafts for those reasons. But you should look at shafts as being ‘good’ or ‘bad’ with regards to how they fit your swing instead of ‘good’ or ‘bad’ in terms of quality.

SHAFT WEIGHT

One of the first things Wishon discusses when it comes to shaft weight is when the golfer uncocks their wrists on the downswing. In Golfing Machine terms, this is called ‘releasing the #2 Power Accumulator.’

Here’s a set of pictures of golfers with different times when they un-cock the wrists in their swing.

[image]

As the picture frame goes to the right, the later the golfer uncocks the wrists (the left and middle pic are the same golfer).

So what Wishon is saying is that the earlier the uncocking, the more important the weight of the shaft is to the golfer versus the Bend Profile (which I’ll get into in a bit).

Conversely, the later the uncocking of the wrists, the more important the Shaft Bend Profile is to the golfer. So the golfer on the left is more dependent on the weight and the golfer on the right is more dependent on the Shaft Bend Profile for optimal performance.

ACCELERATION AND THE SHAFT

One of the things I had questions about is why some higher clubhead speed players can use ‘softer’ shafts than some lower clubhead speed players. I had a friend of mine who generated close to 120 mph of driver speed, yet hit some old True Temper Dynamic Gold R500 shafts the best. So that always puzzled me when I was at a lower speed and playing better with the X100 shaft.

You’ll hear a lot of golfers say that it has to do with how the golfer ‘loads’ the shaft. Well, what does that mean?

I think a simpler way to put it is ‘how does the golfer get to their top clubhead speed.’

Another way to think of it as a sprinter. Let’s say you have 2 sprinters running the 100 meter dash and both clock in at 10.0 seconds. If sprinter A is 6’3” tall and has long legs and is known as a ‘long strider’, he may take a while to hit that top speed. Springer B could be 5’7” tall and from the get-go he’s running fast. So in the first 40 meters or so, Sprinter B could beat out the long strider Sprinter A. But in the last 60 meters, the long strider could be running at a faster speed and in the end catch up to the shorter Sprinter B.

Where it applies to golf is to understand the swing enough to understand what shaft characteristics fit your swing. And the key part of your swing to understand is the level of acceleration your swing produces.

Acceleration = the rate of change of velocity per unit of time.

Let’s say you have 2 cars traveling.

Car A is going 90 mph. The Driver then presses on the gas and is now going 100 mph.

Car B is going 40 mph. The driver presses on the gas and is now going 60 mph.

What has more acceleration?

Car B.

Why?

Because the change in velocity in Car B is 20 mph. In Car A, while moving at a faster velocity, has less acceleration.

Again, you can start to get an idea of the golfer’s acceleration in their downswing by when they start to uncock their wrists.

[image]

Remember Sprinter A vs. Sprinter B?

The swing on the left is more like 5’7” short Sprinter B. They have less acceleration and get their speed up as soon as the starter’s gun is shot in the air.

The swing on the right is more like the long-strider Sprinter A. They have more acceleration as they start out slower and gradually build up a lot of speed in a hurry.

So:

1) The later the uncocking of the wrists = shafts that are heavier and stiffer in the tip section.

2) The earlier the uncocking of the wrists = lighter shaft and softer tip section.

So that’s why my friend liked the old R500 Dynamic Gold Shaft. He generated more speed overall than I did, but his swing had less acceleration. I don’t think they make the R500 anymore and I do not have the shaft bend profile numbers, but my guess is that the shaft had a soft tip section.

BUTT SECTION PROFILE

The butt section determines the feel of the shaft and helps with squaring up the clubface. Have you ever hit a shaft that is supposed to be the correct flex for your swing, but it feels ‘stiff’ and ‘boardy?’ Or how about that shaft that you feel like you ‘can’t get around on?’

Chances are the butt section profile is too stiff for your swing. It also may have more of the weight towards the butt section of the shaft.

Again, here’s where we start to look at how the golfer accelerates the club. But instead of focusing on the uncocking of the wrists, we are looking at the golfer’s downswing transition.

To me, this is a little more of a murky area. But, Iook at the golfer’s swing mechanics in the startdown.

Somebody like Jamie Sadlowksi is a good example of a ‘forceful’ startdown.


If you look at Sadlowski’s startdown, while he’s clearly lagging the club, he almost does it all with a rotational motion of his shoulders and it has a look of him really cranking down. Granted, Sadlowski generates unearthly clubhead speed numbers. But to me, if he only swung at 110 mph, his startdown would be still considered ‘forceful’ and he would probably need a bit stiffer of a butt section profile on his shafts over other golfers with 110 mph of clubhead speed.

Somebody like Boo Weekley I think has a smoother and less forceful transition.


Boo lags the club as well, but he utilizes his wrists and shifting the body pivot towards the target in the startdown to help with that. His rotation of the shoulders is not nearly as much as Sadlowski’s at this point and he has a look that is less ‘cranking down’ than Sadlowski’s swing.

That’s not to say one is superior than the other as Weekley generates about 115 mph of clubhead speed and is one of the best ballstrikers on Tour. But, it’s to say that part of the way they accelerate the clubhead in the downswing is different and it would provide different butt section profiles that fit them best.


TIP SECTION PROFILE

The tip section plays a bigger role in the launch angle and spin rate. The stiffer the tip section, the lower the ball launches and less it spins.

There’s a common fallacy amongst amateurs that they want to have as little spin as possible in order to maximize distance for their clubhead speed. Instead, they should look to maximize launch conditions because if you can increase carry, it will help you hit it further more than if you can increase roll. Of course, one can overdo it by having too much carry and not getting any roll out of the ball. But, we generally want to see launch conditions optimized and to get the ball to land on an angle of about 40-45*, so we maximize total distance.

Tip section profiles is one of the reasons why I stopped worrying about ‘frequency matching’ shafts. To my knowledge, most frequency shaft measurements either measure the total frequency of the shaft or the butt frequency of the shaft.

If it’s just measuring the butt frequency, that would be good to know when trying to fit the butt section profile, but what if the tip section is way too stiff or way too soft? The launch conditions won’t be optimized.

Again, we go back to the uncocking of the wrists on the downswing to help point us in the right direction for tip stiffness.

[image]

The later the uncocking of the wrists (right) the stiffer the tip section will likely need to be. Of course, clubhead speed does play into this as shown by Wishon’s chart in the e-Tech report.

[image]

OVERALL PROFILE

Once you understand your downswing mechanics along with speed, you should be able to get a general idea as to what shafts work for your swing.

For instance, here’s a swing I made back in January.


I generate 110 to 113 mph of driver head speed. I’ve found that I play best with a ‘stiff’ butt section shaft, but a very tip firm (X-stiff) shaft. That’s because I have a fairly average aggression in the startdown with a later uncocking of the wrists. Since I uncock the wrists later (and I uncock them later now than in the video), shaft weight is not as important than if I uncocked the wrists earlier in the swing.

So I play with a UST Mamiya VTS 65x shaft in my driver. With the 3-wood I play a UST Mamiya VTS Red 75x shaft. And then I play with the KBS Tour stiff flex shafts, which spin a little too much for me, but again…they have softer tip sections. So that’s why I’m in the process of switching to a Wishon Stepless steel shaft, which has a stiffer tip section to help bring down the spin a bit.


3JACK

Thursday, July 5, 2012

3Jack Golf's PGA Tour Rundown - Week 26

Tiger picks up his 3rd victory this season at the AT&T National


Here’s my Greenbrier picks:

Tiger Woods: 7/2
Keegan Bradley: 35/1
Dustin Johnson: 20/1
Greg Owen: 66/1
Charley Hoffman: 66/1
Pat Perez: 50/1
Boo Weekley: 125/1
Scott Piercy: 125/1
Roberto Castro: 150/1

Value Pick: Chris Couch: 200/1


ADVANCED TOTAL DRIVING


1. Bubba Watson
2. John Rollins
3. Hunter Mahan
4. Jason Dufner
5. Rory McIlroy
6. Boo Weekley
7. Brandt Jobe
8. Kyle Stanley
9. Graham DeLaet
10. Graeme McDowell


176. Tommy Biershenk
177. Billy Hurley III
178. Tom Pernice Jr.
179. Nick O'Hern
180. Michael Bradley
181. Derek Lamely
182. Matt Bettencourt
183. Stephen Gangluff
184. Joe Ogilvie
185. Ryuji Imada

Biggest Improvement: Billy Hurley III
Biggest Decline: Dustin Johnson


PUTTS GAINED (VIA PGATOUR.COM)

1. Ben Curtis
2. Aaron Baddeley
3. Luke Donald
4. Derek Lamely
5. Zach Johnson
6. Bo Van Pelt
7. Bryce Molder
8. Ryan Palmer
9. Carl Pettersson
10. Brian Gay


176. Greg Owen
177. Kris Blanks
178. Vijay Singh
179. D.J. Trahan
180. Chris Kirk
181. Ricky Barnes
182. Kyle Stanley
183. Scott Stallings
184. Scott Brown
185. Boo Weekley

Biggest Improvement: Stewart Cink
Biggest Decline: Mark Anderson


SHORT GAME PLAY

1. Ian Poulter
2. Kevin Kisner
3. Jerry Kelly
4. Rory McIlroy
5. Jason Dufner
6. Bob Estes
7. Brian Gay
8. Rocco Mediate
9. Justin Rose
10. Steve Stricker


176. Sang-Moon Bae
177. Cameron Beckman
178. Jeff Maggert
179. Hunter Mahan
180. Blake Adams
181. Ryan Moore
182. Michael Thompson
183. Gary Woodland
184. Harris English
185. Charlie Beljan

Biggest Improvement: Billy Hurley III
Biggest Decline: Mark Anderson


BIRDIE ZONE PLAY


1. Steve Stricker
2. Jason Bohn
3. Padraig Harrington
4. Henrik Stenson
5. Brendon de Jonge
6. Webb Simpson
7. Jeff Maggert
8. Sergio Garcia
9. Vaughn Taylor
10. Bo Van Pelt


176. Jonas Blixt
177. D.J. Trahan
178. Aaron Baddeley
179. Brandt Jobe
180. Billy Hurley III
181. Jhonattan Vegas
182. Sang-Moon Bae
183. Scott Stallings
184. Jamie Lovemark
185. Edward Loar

Biggest Improvement: Angel Cabrera
Biggest Decline: Sean O’Hair


SAFE ZONE PLAY


1. Lee Westwood
2. Graeme McDowell
3. Nick O'Hern
4. Ian Poulter
5. Steve Wheatcroft
6. Jeff Maggert
7. Angel Cabrera
8. Robert Allenby
9. Bud Cauley
10. Jason Dufner


176. Billy Hurley III
177. Tom Gillis
178. J.J. Killeen
179. Gary Woodland
180. Henrik Stenson
181. Edward Loar
182. Troy Kelly
183. Jamie Lovemark
184. Briny Baird
185. Mark Anderson

Biggest Improvement: Jason Day
Biggest Decline: Charles Howell III


DANGER ZONE


1. Bubba Watson
2. Bo Van Pelt
3. Steve Stricker
4. Chad Campbell
5. Justin Rose
6. Louis Oosthuizen
7. Gary Woodland
8. Jim Furyk
9. Daniel Summerhays
10. Boo Weekley


176. Jerry Kelly
177. J.J. Killeen
178. Stephen Ames
179. Joe Ogilvie
180. Derek Lamely
181. Ryuji Imada
182. Ted Potter, Jr.
183. Nick O'Hern
184. Richard H. Lee
185. Edward Loar

Biggest Improvement: Dicky Pride
Biggest Decline: Sang Moon-Bae


3JACK

Tuesday, July 3, 2012

AimPoint Bubble Review

[image]

One of the fascinating parts of learning about the game is when good golf instruction adapts over time to find more accurate information. While most golf instruction fanatics prefer accuracy of information first and foremost, the applicability of that information should also be given tremendous consideration. While information may be great in theory, it does the golfer little good if they cannot reasonably apply that to their own game. From there, we should seek to make the applicable information more efficient and easy to execute.

My putting instructor, David Graham (http://www.efloridagolf.com/david-graham.htm), went over a new method to learning AimPoint green reading earlier this year. The older method of walking around the putt in a circle, finding the high anchor, finding the low anchor, etc, is still applicable to reading greens. However, a new method has been developed to make AimPoint easier to execute and take much less time. I actually still use some of the techniques to the older method from time to time, in particular locating the high and low anchor points. And, the old method of walking around in the circle does help with training yourself to feel the slope with your feet. But, the new method has probably increased my accuracy and efficiency by tenfold.

One of the issues I’ve come across in discussing AimPoint with other students is that many students do not realize that you MUST practice AimPoint if you want to get better at it. Learning to feel with your feet takes practice just as learning how to improve your takeaway in the backswing takes practice on the driving range. The same goes for diagnosing the amount of slope, deciphering what the aim looks likes from different putting distances, getting a routine down, trusting the read, and basic troubleshooting.

Many people who have learned AimPoint don’t understand that and they think that they can just bring it out on the course and have no problems. If they would spend their putting practice focusing on AimPoint instead of blindly hitting some putts or putting some sort of putting stroke training aid device, I believe they would understand putting much better and would sink more putts.

[image]

Recently I was introduced to AimPoint’s new product, the AimPoint Bubble. It’s a rather simple bubble level device that helps detect the slope. It retails at $40 and can be found here http://aimpointgolf.3dcartstores.com/

Here’s a little demonstration of the AimPoint Bubble by its inventor, Stephen Aumock.


Originally, I had some skepticism about the AimPoint Bubble because the price point was not a lot less than the Husky Digital Bubble Level that I own that I use for AimPoint. However, I had some issues with the Husky Digital Level as well:

1. It requires batteries.
2. It’s about 1 foot long and is a little cumbersome to carry around.
3. It does not easily find the zero line.

The first thing you will notice about the AimPoint Bubble is that it is small in size. It’s about the size of a silver dollar. In fact, if you are practicing AimPoint on the course, you can use it to mark your ball (obviously, it’s not legal for play). It is also a basic level of sorts, so it does not require any batteries or any electrical power.

[image]

When using the Husky Digital level, the idea is in order to find the zero line, you want to want to get the reading of the slope as steep as you can. But, I have found issues with that and unless you understand how to feel with your feet, you can produce some fairly inaccurate reads using the Digital Level.

I think the issue with the bubble levels is that the bubble lays horizontally. The AimPoint Bubble lays on top of the ground. Plus, it has directional measurements on the bubble which are applicable to using AimPoint.

While Aumock shows us how to use the AimPoint Bubble a certain way. I tried it in different fashions. For starters, I would put the Bubble where the ball is located and point the 0-line on the bubble at the hole. If it’s a planar slope putt, the Bubble will give you a read directly on that putt. So if you have a putt that is 60° down (aka 2 o’clock), if you have the bubble where the ball is located, the Bubble will be located at 60°.

Again, it’s not legal for play. But, I would use this for practice to help better understand my skill level with AimPoint. Sometimes I would flip the Bubble over so it wouldn’t show the break. Then I would go thru my routine of calculating the break and then I would flip the bubble over and see what it says. I would also use Aumock’s method in the video and try to see if I could guess the zero line.

What I found was I have a tendency to read towards 90° (3 or 9 o’clock) too often. And I also read too much break when I was actually directly on the zero line.

Probably the greatest part of the Bubble is that I was surprised by its accuracy. Not only from a slope direction perspective, but also in slope steepness. The little arc markings are spot on for determining the percentage of slope.

If own the Husky Digital level, you can still use it. The AimPoint Bubble only measures the slope to 4%. So if you are looking for readings on slopes more than 4%, you could use both in conjunction with each other.

The only complaint I have heard is that due to the small size of the AimPoint Bubble that a spike mark could throw off the reading. While that could be true to a degree, I’ve found from owning the Husky and the Exelys Breakmaster, that alterations in the green from spike marks and ball marks actually reek more havoc because they are electronic. Not that I think it really matters because I go by the old carpenter’s rule of ‘measure twice, mark once.’

In the end, the AimPoint Bubble really surprised me with how well it works and I recommend it for AimPoint users.


3JACK

Monday, July 2, 2012

Thoughts On Carrying 2 Drivers...

[image]

With Tropical Storm Debby drenching much of Florida, I started to think about owning 2 different driver lofts and/or shafts in order to better suit myself for the weather. Florida summers usually see heat, humidity and then downpour for about 15 minutes to an hour. This actually works out nicely for courses from tee to green as the rain gives the ground the water it needs and the extreme heat and a little breeze dries everything up nicely. Then it’s a rinse and repeat process.

However, if we go without rain for 2-3 days, the ground gets very hard and you’re now likely to see brush fires. Conversely, sometimes the rain goes into overload for a few days and absolutely drenches the course.

With that, I was curious about approaching 2 different drivers. Now, obviously one could change their swing mechanics to hit the ball lower or higher. In fact, I usually do that a few times a round with my irons, usually switching to a higher ball flight mechanics on front pin locations. But, that may occur 2-3 times a round max.

Why?

Because if I’m in the Danger Zone, I’m usually just thinking about making good contact and finding the green. So that generally takes away my 3-iron, 4-iron and 5-iron shots. And if I have less than 150 yards into the green, I’m probably hitting no more than a 9-iron with my stock swing and those shots generally fly high enough and spin enough to get a front pin location shot close.

However, if I’m trying to hit high ball drivers to counter soft fairways, now I’m probably altering my swing at least a dozen different times on the course and I don’t quite feel that comfortable in doing so.


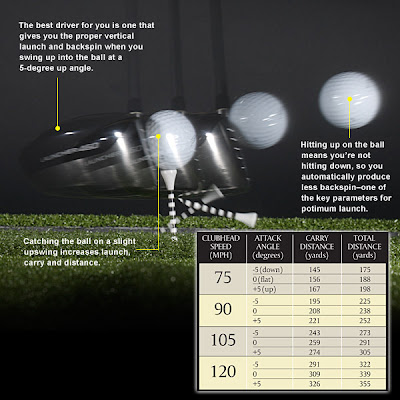
LAUNCH ANGLE

[image]

From my reading, it appears that essentially there’s ‘optimal total distance’ and ‘optimal carry distance’ with the driver. So, optimal distance does NOT necessarily mean that the driver will carry the furthest. In fact, there’s likely to be some driver components that will max out the carry distance, but in ‘normal conditions’ will not max out the total distance.

The main factor appears to be the launch angle. And it appears that if you can find the driver components that equate to maxing out total distance, than you need to find the driver and components that will increase the launch angle by roughly 2°. So, if you’re optimal total distance launch angle is 9.3°, then your optimal carry distance launch angle will somewhere in the neighborhood of 11.3°.


CLUB COMPONENTS

[image]

My belief is that if you’re going to do this, you should just change the loft of the club. The shaft and head model should probably remain the same. Sometimes companies will have similar clubhead models, but alter the location of the Center of Gravity. The lower CoG can produce a higher launch angle while the higher CoG can produce a lower launch angle. I believe Titleist’s D2 and D3 models are built that way.

This may not be a bad way to go, if you can find a company that has driver models built like this. Still, the differences in CoG may not affect the launch enough and may affect the spin more which may or may not be conducive to increasing your carry.

The shaft can help with this, particularly if the tip-section of the shaft is softer which will help loft the ball in the air. But, I think it’s very risky to change a shaft too much. In Tom Wishon’s June 2012 eTech Newsletter (http://wishongolf.com/etech/archive/2012-2/june-2012/) he states that the maximum difference in launch angles they see between shaft bend profiles that fit a golfer is 2°. While that sounds exactly what we want, it sounds like that is still a rare case to get as high as a 2° difference. Plus, that 2° difference is from the lowest launch angle to the highest launch angle for those given shafts. So, if I hit a Graphite Design shaft that ‘fits’ my swing and it’s the lowest launching shaft of the bunch at 8°, then the highest launching shaft could be an Aldila shaft at 10°. But, the optimal total distance launch angle may belong to a Harrison shaft at 9.3°. So in order to max the carry, I actually need to find a way to get the launch angle at +2° higher than the 9.3° Harrison shaft.

Lastly, you would need a lot of shafts to try out with a Trackman or a FlightScope X2 in order to get closer to that 11.3° launch angle that optimizes carry distance.

Thus, my belief at this time is that you can probably alter the launch angle consistently by altering the static loft in the driver and keeping the head model along with the shaft model the same. How much the static loft will have to change would probably need Trackman or FlightScope X2 to get a precise measurement.


COMMON WIND PLAY MYTH

One of the things that I have found to be a myth is that hitting the ball high into a wind will automatically cause the golfer to lose more distance than if they hit it lower. I don’t find that necessarily true. Where I think golfers get mostly into trouble with high trajectories into a tough breeze is with accuracy and predictability of the ball flight.

I think where the distance differences come from a lower ball flight versus a higher ball flight is from a ‘spinny’ shot. The extra spin causes the ball to balloon in the air and the golfer would have been better hitting a lower trajectory shot. But, if the golfer hits a higher trajectory and keeps the spin loft lower, they can easily hit the higher trajectory shot into the wind further.

[image]

Again, here’s the formula for spin loft:

Dynamic Loft – Attack Angle = Spin Loft

So what happens with those high ballooning shots is the golfer may increase the steepness of their attack angle and/or increase their dynamic loft. Both of which will increase the spin loft and cause a ‘spinny’ shot that balloons into the wind.


SOME EXAMPLES

Let’s say my ‘stock’ swing produces these numbers:

10° Dynamic Loft - 0° Attack Angle = 10° Spin Loft

However, I hit the following shots into a 25 mph breeze:

Shot #1: 10° Dynamic Loft – (- 2°) Attack Angle = 12° Spin Loft. Max Height 93 feet

Shot #2: 10° Dynamic Loft – (+) 2° Attack Angle = 8° Spin Loft. Max Height 110 feet

All things being equal, I would hit Shot #2 further, even though I hit it higher in the air because the Spin Loft had decreased and I’m not hitting nearly as ‘spinny’ of a shot as Shot #1 which had a lower Max Height.


USING 2 DRIVER IN THE BAG AT ONCE

With that, I have talked to clubfitters who have discussed success with having themselves and their customers who use 2 drivers in the bag at once. These are often in windy areas where the golfer can use the higher lofted driver on a hard tailwind and a lower lofted driver in a strong headwind.

So as long as the golfer does not alter their attack angle, they can effectively reduce the Spin Loft or increase Spin Loft.

The idea is that they could take their ‘normal swing’ and if their attack angle stays the same, they’ll reduce the Spin Loft with the lower lofted driver into the wind. And with the wind, they’ll increase their spin loft which is okay in a strong tailwind. However, it should be noted that if the wanted to hit it purely FURTHER with a tailwind, they wound want to actually decrease the Spin Loft by shallowing out our hitting up with their attack angle. But again, this requires the golfer to alter their swing and many golfers, even PGA Tour players, do not like doing this in a round of golf.


WAS LEFTY, RIGHT?

[image]

The most famous case of using 2 drivers at once goes to Phil Mickelson. Of course, most presume that Phil was automatically correct in his decision because the first time he used 2 drivers at Augusta, he won the Masters. But, winning doesn’t always necessarily mean that the player made the right move.

However, upon further examination, I think Phil made a brilliant move because it not only put him at a SIZEABLE advantage over the rest of the field, most of the golfing world thought he was nuts and he did it anyway.

First, we should understand that from a statistical standpoint, expected scores for Tour players start to change when there’s a difference of 25 yards or more. Also, we should remember that hitting the fairway does provide an advantage to golfers, even Tour players. From about the same distance, Tour players will hit their approach shot about 30-40% closer on average from the fairway than the rough.

However, that does not mean that a Tour player should just take a 3-wood out and hit fairways. Why? Because the loss of distance between using a 3-wood versus a driver off the tee is too great. And I think most Tour players probably hit their 3-wood about 40 yards shorter than their driver off the tee. So not only does their expect score likely go up when they scale back 40 yards, but you add that up over a round of 18 holes and now you are seeing a sizeable difference.

In other words, ask yourself ‘would you buy a driver that you hit 40 yards shorter but can hit 80-90% of the fairways with?’

I think most golfers would say ‘no way.’

[image]

Okay then…who should consider using 2 drivers in the bag at once?

1. Golfers who can be pretty sure that they can get about 25+ yard advantage with each driver when used for each condition (ala tailwind vs. headwind drivers)

2. Golfers who are long enough where they likely will not need a 3-wood off the deck on par-5’s.

3. Courses that do not call for many 3-wood shots off the tee.

4. Golfers who can hit one of the drivers well off the deck.

In Mickelson’s situation, his drivers were designed to work the ball. One could hit a draw, the other a fade. So, there was no 25+ yard advantage from that perspective.

Mickelson fit well into #2. Holes 13 and 15, Phil could get in two with an iron. #8 may be a stretch for Phil to go driver-hybrid into, but I think he can get somewhat close. Furthermore, it’s a tall order to reach that green in 2 shots for anybody.

Phil also doesn’t hit the driver off the deck much like a Bubba Watson would, so that ruins #4 for him.

However, the brilliance of the idea was behind #3 and in the end, that affected #1.

Augusta does generally call for some 3-woods off the tee for long hitters like Phil. #10 is a perfectly example. It’s a 500 yard par-4, but it goes straight downhill and bends to the left. The longer hitters generally take a 3-wood off the tee and with the downhill slope and super-fast fairways, they can belt one about 310 yards down the middle. The golfers who use driver are almost exclusively shorter hitters, who will hit it the same distance or thereabout.

But with Phil and his 2 drivers, he had such confidence in them drawing and fading on command, he could comfortably belt the fade driver on #10 and hit it, let’s say 350 yards. Thus, while he technically didn’t hit either driver noticeably further, the fact that he could use the driver on holes where the longer hitters were using 3-wood, Phil was gaining a sizeable advantage.

With the golfers who want to use 2-drivers for wind purposes, I would first ask “can I get a 25+ yard advantage with either driver versus using the stock driver?’ If so, I would then start to contemplate using 2-drivers, if I feel I won’t need a 3-wood that much or that I am really adept at hitting one of the drivers off the deck.


PHIL'S DECISION AT THE 2009 US OPEN

In the ’09 US Open at Torrey Pines, Mickelson did not utilize a driver and while he missed the cut, that does not automatically mean that he’s wrong.

However, I do believe that was a poor decision.

For starters, I do believe that he reasonably could use the driver on 2-3 holes at that tournament. And on those holes he was probably losing roughly 40 yards on each tee shot. Total that up, and it comes to 80-120 yards.

Secondly, if he gets in a situation where he desperately needs a birdie, he needs to leave himself with a shorter approach if he can. But, he doesn’t really have that option if he doesn’t have a driver to bomb away with.

Given his length off the tee, my belief is that the only way going without a driver would have been a smart decision is if he was very confident that he could hit his 3-wood accurately enough to be in the top-5 in the field in driving accuracy. Otherwise, he’s really putting himself behind the 8-ball.


CONCLUSION

This is something I may wind up trying out. Currently, I utilize a 10° loft Wishon 919THI driver with a 45-1/8” UST Mamiya VTS Silver 65x shaft. My feeling is that if I don’t optimize my total distance with this club, I come very close. Thus, I think I probably need something like a 11.50 to 12.0° head with the same components in order to find a driver that maximizes carry.

That being said, I don’t think a golfer has to gain 25+ yards off the tee with an alternate driver if they are only using one of the drivers for those set of conditions. It’s when you carry 2-drivers in the bag, which may be an entirely smart move, that you need to consider the potential pitfalls and rewards.


3JACK

Thursday, June 28, 2012

Top and Bottom 3 Driver's Swings On Tour

Here's a look at the top-3 and bottom-3 swings in my metric, Advanced Total Driving. You judge for yourself the similarities and differences.


TOP-3


Bubba Watson


John Rollins


Jason Dufner


BOTTOM-3

Matt Bettencourt


Ryuji Imada


David Duval


3JACK

Wednesday, June 27, 2012

Tackling Blowup Holes

One of the questions I keep receiving with regards to my course management metric research is ‘how do I avoid ‘blowup’ holes?’

I think it helps to understand what holes are likely to be a blowup hole, why they may be a blowup hole and what situations are conducive to creating a blowup hole.

[image]

What holes are likely to be a blowup hole?

For players across the board, usually the blowup hole will occur on a difficult driving hole. Particularly when the tee shot does not fit the golfer’s miss. For example, at last year’s FSGA Mid-Am at Old Marsh Golf Club, I was doing fine in the first round until I hit the 17th hole, a fairly tight par-5 where there was almost no room to the right and the wind was blowing to the right. At the time, that really didn’t fit my ballstriking because my miss was typically to the right and if I aim left to avoid it, I tend to over-do it and hit a dead-yank left.

And that’s what happened, a dead-yank hits a tree and actually kept the ball in play on a small cart path meant for the grounds crew. I wound up going from +1 after 7 holes to taking a 9 and being +5 after my 8th hole.

As I stated in my analysis of the WSJ Article on metrics and golf, as the scores get higher in a round of golf, improvements off the tee will make the largest improvements in that score. So, if a Tour pro shoots 82 on a course, he most likely had a bad day with the driver and had some bad holes due to the driver causing him issues. The penalty for bad shots with the driver is generally much more severe than bad shots with any other club.

The other holes where ‘blowups’ tend to occur are on Danger Zone approach shots. Particularly if there’s a hazard or O.B nearby. I would typically believe this happens on par-3’s more than par-4’s because usually the par-4’s are designed with the idea that they are very long (say, 450+ yards) and the purpose of the design is to force the golfer to hit two shots a long ways more than having to be very accurate with those shots. Furthermore, courses often design their par-3’s as their ‘signature hole’ which is usually surrounded by water and if the hole is a very long par-3, so be it.

I think the point here is that it’s good to identify these blowup holes early on and focus your attention to playing these holes well. If you’re playing a tournament, your practice round should probably have you hitting a bunch of balls and different shots on this hole to figure out the way you can most comfortably play the hole well. And when you’re on the range, you should envision hitting shots on those possible blowup holes before you go out and pla.


Why is a blowup hole a blowup hole?

A blowup hole for one golfer may not be a problem for another golfer. For instance, #3 at Olde Atlanta is a 200-210 yard par-3 with not a lot of room if you miss the green. If you’re more than 15 yards short of the green, you go into a small canyon that is a hazard. If you miss more than 5 yards left, you’re likely in some bushes that are there to protect the golfers on the 4th tee. There’s very little room right or long.

For me, it’s a 4-iron. For one of my friends, he hits it so long that it’s a mere 7-iron for him. Now, he’s not the most precise ballstriker I ever came across, but hitting a 7-iron is not a problem for him. And if I am a little offline with a 4-iron on that hole, it can be a disaster.

As we make it to the 4th hole, This hole is relatively easy for me. I can hit a driver right down the middle and have about 80-110 yards into the green. However, my friend struggles with it because he hits the ball so long that it requires him to hit a shot from right-to-left and he’s a left-to-right player. He could take less club, but it is one of those situations where less club will have the ball landing in an area surrounded by fairway bunkers. This creates an overload of worry for him and he often takes a poor swing on that hole and plays it poorly.

In essence, the 3rd hole is a potential blowup hole for me because of the pure level of difficulty of the shot. And the 4th hole is a potential blowup hole for him because the tee shot does not ‘fit his eye.’

It’s often easy to gloss over the shot that does not fit your eye and assume that because the hole is not difficult for most people that you’ll eventually ‘get it’ and play the hole well. But in my mind, the hole that does not fit your eye is one of the holes you should focus your efforts on the most.


What situations are conducive to create a blowup hole?

Just because a hole ‘fits your eye’ or is not considered overly difficult, that does not mean you will not have a ‘blowup’ hole because of it.

Obviously, we already discussed those holes with difficult and troubling tee shots are holes that usually are the ‘blowup holes.’ But what about the times you blowup on a hole when you don’t hit your tee shot O.B. or in a hazard?

One of the big ones I’ve found is when you are in the Danger Zone and in particular, with an impeded shot.

What are ‘impeded shots?’

- O.B.
- Hazards
- Fairway bunker
- Thick rough
- Trees that you have to hit around, under or over
- Lie in a divot
- Difficult lies in general that impede your progress towards the cup

If you’re in the ‘Danger Zone’ and your shot is impeded, your odds of having a ‘blowup hole’ have increased dramatically. What’s really tricky is let’s say you’re in the deep rough with a clear shot at the green, but 200 yards away.

Your brain will tell you to hit the shot and that it’s no big deal. But what may wind up happening, even to a Tour player, is that disaster happens at impact because of the club design and the tall grass. Then the face is hooded at impact and you hit the shot so far dead left that it gets into even worse trouble. Then what came off as a shot at hitting the green and making par has now turned into a situation where you’ll be lucky to take a bogey. I am not saying to not hit that shot, but it’s important to realize the possible dangers of that shot and making sure that it doesn’t happen.

It’s very important to understand that unless you have the magic of a Phil Mickelson or Bubba Watson, often times you can bit off way more than you can chew.

In fact, currently the PGA Tour average proximity to the cup on Danger Zone shots from the *rough* is about 57 feet. For those same shots from the fairway or teebox, it’s about 38 feet. A difference of nearly 20 feet.

So in the end, if you can spot the holes that are potential blowup holes, figure out why they are a blowup hole and understand the situations which could potentially be a blowup hole, you are now putting yourself in a position to avoid those big blowups that kill a round.


3JACK

Monday, June 25, 2012

3Jack Golf's PGA Tour Rundown: Week 25

Marc Leishman wins in Hartford.


Last week, the ShotLink data didn't update due to the US Open being played, I didn't update the rankings.

Here are my picks for the AT&T Classic:

Bo Van Pelt: 33/1
Jim Furyk: 16/1
Brendon De Jonge; 80/1
Kevin Stadler: 100/1
Brian Davis 66/1
Greg Owen: 80/1
Dustin Johnson: 16/1
Charlie Wi: 80/1
KJ Choi: 33/1
Matt Every: 100/1

Value Pick: Dickey Pride 200/1


Here are the current rankings:


ADVANCED TOTAL DRIVING


1. Bubba Watson
2. John Rollins
3. Jason Dufner
4. Rory McIlroy
5. Kyle Stanley
6. Tiger Woods
7. Hunter Mahan
8. Boo Weekley
9. Graeme McDowell
10. Roberto Castro


177. Tommy Biershenk
178. Nick O'Hern
179. Billy Hurley III
180. Michael Bradley
181. Derek Lamely
182. Stephen Gangluff
183. Joe Ogilvie
184. Matt Bettencourt
185. Ryuji Imada
186. David Duval

Biggest Improvement: Robert Karlsson
Biggest Decline: Michael Bradley

PUTTS GAINED (VIA PGATOUR.COM)

1. Aaron Baddeley
2. Luke Donald
3. Bo Van Pelt
4. Derek Lamely
5. Zach Johnson
6. David Duval
7. Bryce Molder
8. Brian Gay
9. Ryan Palmer
10. Martin Flores


177. Chris Kirk
178. Vijay Singh
179. D.J. Trahan
180. Greg Owen
181. Heath Slocum
182. Ricky Barnes
183. Kyle Stanley
184. Scott Stallings
185. Scott Brown
186. Boo Weekley

Biggest Improvement: Nathan Green
Biggest Decline: Matt Jones

ADJUSTED SHORT GAME PLAY

1. Ian Poulter
2. Kevin Kisner
3. Jerry Kelly
4. Rory McIlroy
5. Jason Dufner
6. Mark Anderson
7. Brian Gay
8. Sean O'Hair
9. Bob Estes
10. Rocco Mediate

177. Robert Garrigus
178. Ryan Moore
179. Tim Clark
180. Jeff Maggert
181. Cameron Beckman
182. Hunter Mahan
183. Michael Thompson
184. Harris English
185. Gary Woodland
186. Charlie Beljan

Biggest Improvement: Fredrik Jacobson
Biggest Decline: Hunter Mahan

BIRDIE ZONE PLAY


1. Steve Stricker
2. Jason Bohn
3. Padraig Harrington
4. Jeff Maggert
5. Henrik Stenson
6. Brendon de Jonge
7. Webb Simpson
8. Nick O'Hern
9. Sergio Garcia
10. Rory Sabbatini


177. Brandt Jobe
178. Angel Cabrera
179. D.J. Trahan
180. Jhonattan Vegas
181. Aaron Baddeley
182. Billy Hurley III
183. Sang-Moon Bae
184. Scott Stallings
185. Jamie Lovemark
186. Edward Loar

Biggest Improvement: Charlie Beljan
Biggest Decline: George McNeill

SAFE ZONE PLAY


1. Lee Westwood
2. Graeme McDowell
3. Nick O'Hern
4. Ian Poulter
5. Steve Wheatcroft
6. Jeff Maggert
7. Angel Cabrera
8. Robert Allenby
9. Bud Cauley
10. Jason Dufner


177. Tom Gillis
178. J.J. Killeen
179. Gary Woodland
180. Henrik Stenson
181. Edward Loar
182. Troy Kelly
183. Jamie Lovemark
184. Briny Baird
185. Mark Anderson
186. Matt Jones

Biggest Improvement: Garth Mulroy
Biggest Decline: Scott Brown


DANGER ZONE PLAY


1. Bubba Watson
2. Chad Campbell
3. Steve Stricker
4. Justin Rose
5. Louis Oosthuizen
6. Bo Van Pelt
7. Jim Furyk
8. Gary Woodland
9. K.J. Choi
10. Brandt Jobe


177. Blake Adams
178. Stephen Ames
179. Joe Ogilvie
180. Derek Lamely
181. Ted Potter, Jr.
182. Ryuji Imada
183. Richard H. Lee
184. Nick O'Hern
185. Steve Wheatcroft
186. Edward Loar

Biggest Improvement: Charlie Beljan
Biggest Decline: Louis Oosthuizen


3JACK